Ads 468x60px

venerdì 12 luglio 2013

Holothon #04: Hits Speciallità Hera

Alcuni smalti sono magici. Avete presente? Quel tipo di smalti che potete vedere in migliaia di foto, ma solo nel momento in cui li indossate capite davvero quanto speciali siano.
E non perché le foto che avete visto non siano accurate o ben fatte, perché lo sono, eccome: semplicemente, perché alcuni smalti hanno una magia che si sprigiona nel momento in cui stendete la prima pennellata.
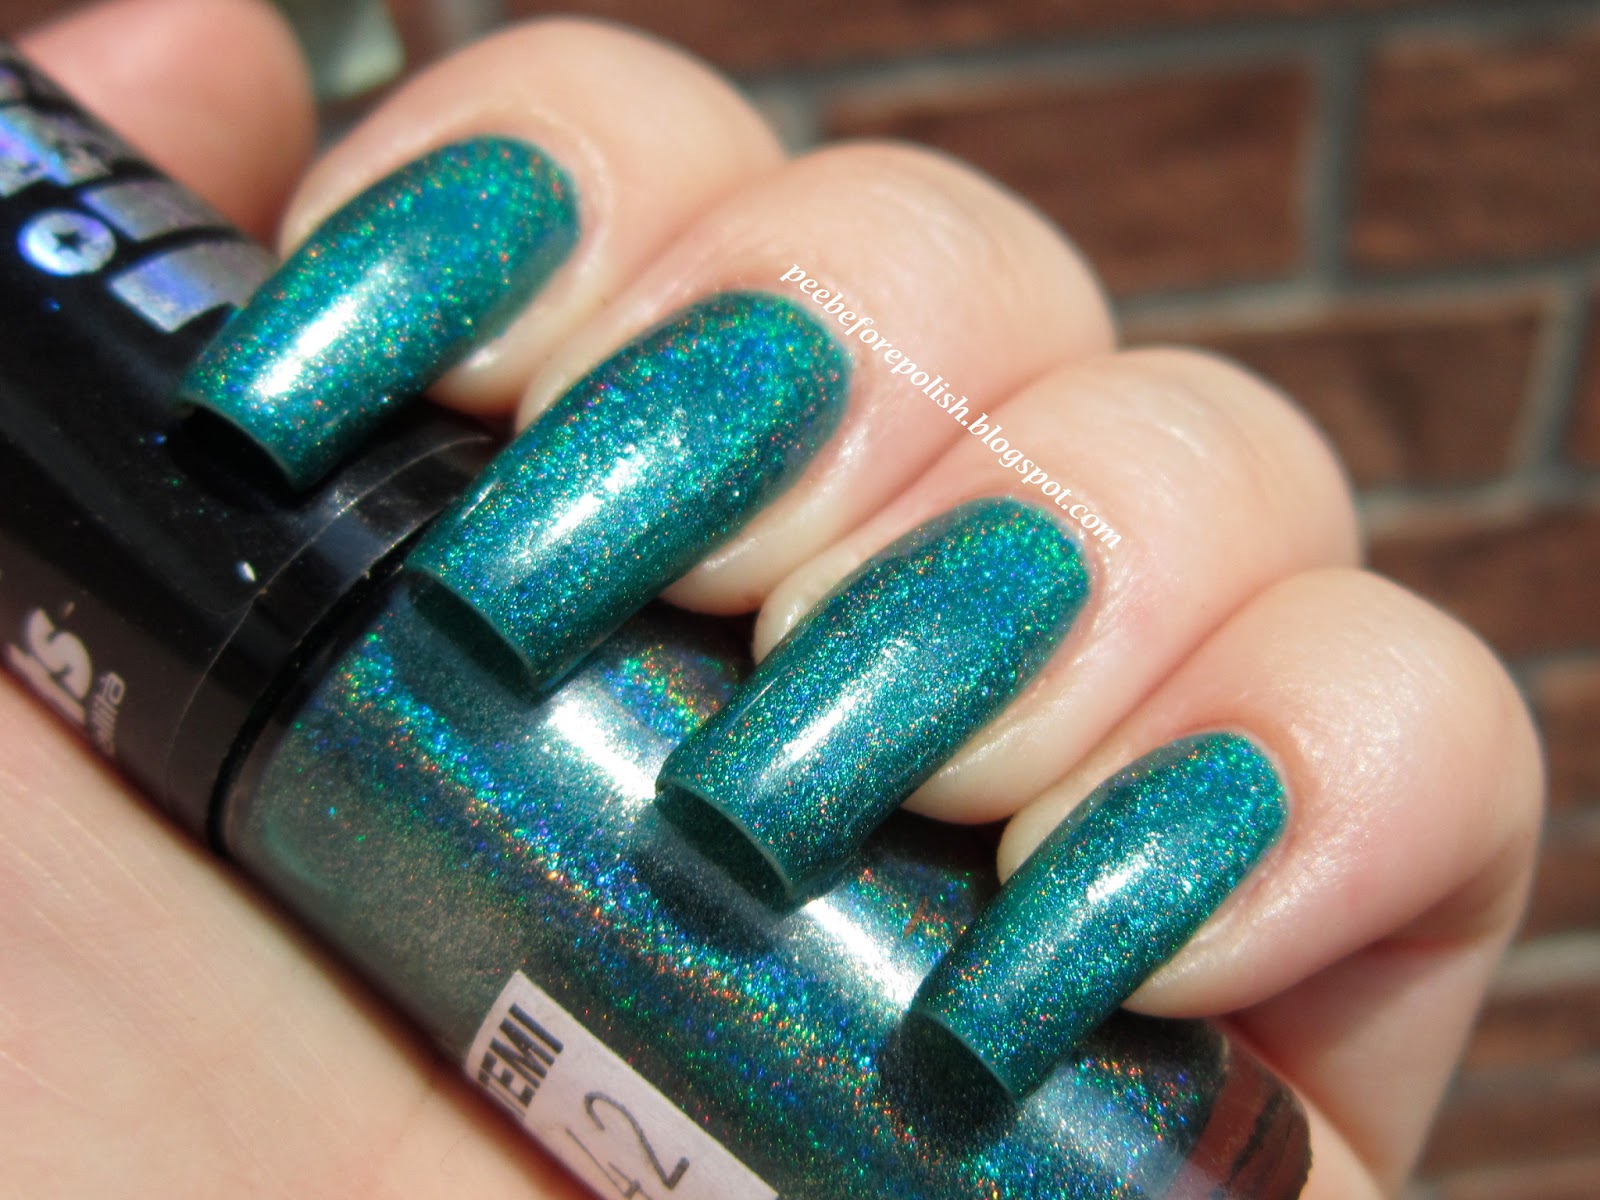
E questo è ciò che mi è accaduto con l'Hits Speciallità Hera (collezione No Olimpo 2011), un verde ottanio dal notevole effetto holo linear. Pensate al mare dei Caraibi e aggiungeteci un tocco di polverina fatata, ed ecco qui come appare Hera.
Due mani nelle mie foto, l'applicazione è davvero fluidissima ma ho avuto qualche problemino con l'asciugatura: non so se sia dipeso dal caldo o da altri fattori, ma ci ha messo un bel po' ad asciugare. Ho riprovato mettendo un top coat (non fast drying) e le cose sono decisamente migliorate.
Riguardo alla durata: beh, eccezionale! E' vero che ce l'ho su da tre giorni e mezzo, ma in questo lasso di tempo ne ho combinate più di Bertoldo: ho lavorato due giorni in cava, mi sono fatta due docce al giorno e mi sono lavata tre volte i capelli, ciononostante noto solo un leggero tipwear. Fantastico!
E anche per oggi è tutto, buon fine settimana donzelle e grazie a tutte coloro che ieri mi hanno fatto gli auguri!

Some nail polishes are simply magical. You know, I'm talking about that kind of polish that you can see photographed in thousands of pics, but only when you wear it you really understand how special it is. 
And not because the photos you saw are not accurate or well done, because they are, but simply because some nail polishes have a magic touch that is released when you apply your first coat. 
This is what happened to me with Hits Speciallità Hera (No Olimpo collection 2011), a teal green with a strong holo linear effect. Think about the Caribbean sea and add in a touch of fairy powder, and here it is how Hera looks. 
Two coats in my pics, application is really smooth and easy but I had some problems with drying time: maybe it was the super hot weather, maybe other factors, but it took quite a lot to dry. 
I tried again with a top coat (not a fast drying one) and things have definitely improved. 
Talking about its longevity, well, it's exceptional! I've been wearing it for three days and a half, but during this time I got up to all kinds of things: I worked for two days in a quarry, I got two showers a day and I washed my hair three times in less than four days but I only have a slight tipwear. Fantastic! 
And all's all I have for you today, I wish you a great weekend and thanks to all the wonderful ladies who wished me a happy birthday yesterday! I am older, but not wiser!


Applicazione / Application
4.5/5
Asciugatura / Drying time
3/5
Coprenza / Pigmentation
4.5/5
Durata / Longevity
5/5
GIUDIZIO FINALE / OVERALL
4.5/5


giovedì 11 luglio 2013

Happy birthday to me! [and holo spam!]

Eh sì signore mie,
oggi è il mio compleanno! E per festeggiarlo sul blog ho deciso di spammare un sacco di foto di smalti olografici, che poi sono anche i miei preferiti.
Ma ora vado a festeggiare, a voi dò appuntamento a prestissimo!

Yes ladies,
today's my birthday! I decided that the best way to celebrate here is a holo spam post, since you know that holographic is my favourite finish.
Talk to you very soon and have a nice evening!


martedì 9 luglio 2013

CND Vinylux: my experience, swatches and review [and video!]

Ciao a tutte!
Come promesso ecco il post in cui vi illustro la mia esperienza col CND Vinylux.
Procediamo punto per punto, verificando se il prodotto ha mantenuto le sue promesse!
In primis: la durata settimanale. Sì, il CND Vinylux Pink Bikini ha dimostrato un'ottima durata e resistenza alle numerose docce e lavaggi di capelli tipici dell'estate. L'ho tolto al giorno 8 ma era ancora in condizioni eccellenti. L'unico segno del tempo si è estrinsecato in un leggerissimo tip wear ai lati delle unghie ma non in punta, come potete vedere nelle foto sottostanti.

Hi ladies!
Here it is my complete review about CND Vinylux. I have to say that I'm really happy with this product, but let's see step by step if CND kept its promises.
First-of-all: longevity. Does Vinylux really last at least one week on nails? Yes. You can see it in my pics: after 8 days I only have a minor tip wear on some angles of my nails. No chipping at all. Even if during these 8 days I took a lot of showers and I often washed my hair - it's really hot here in Italy in these last 2-3 weeks. Here below you can see the pictures I took at day 2, 6 and 8.


Secondo: si applica e si rimuove davvero come uno smalto comune? Sì, e per mostrarvelo meglio ho preparato un video, riassuntivo in realtà di tutta la mia esperienza e che include anche la presentazione del prodotto.

Secondly: does it really apply and remove just like a common polish? Yes, you can see it in my video here below. Sorry girls, no english subtitles in this case, it's a very long process (it takes two or three hours) and I don't have the time to do it. But I included all the information in this post and in my previous one.


Terzo: l'assenza della base si fa sentire? No, perché il prodotto non macchia le unghie. Ma se preferite applicarla perché non ve la sentite di abbandonare il vostro indurente et similia, non c'è assolutamente nessuna controindicazione. Io ho applicato la base solo su pollice ed indice, e come avete visto lo smalto ha retto benissimo.

Thirdly: does it stain on the nails? No, it doesn't stain. But if you want to apply your favourite base coat (just like a nail hardener base), you can do it. I applied Sally Hansen Diamond Strenght on my thumb and on my index fingers, and as you can see in the pictures here above this didn't interfered.


In conclusione: lo consiglierei? Sì, come già detto soprattutto a chi non ama cambiare smalto troppo spesso, a chi non vuole rischiare di vedersela con sbeccature e tip wear precoci, ma al contempo non vuole recarsi dall'estetista per l'applicazione di un semipermanente per i motivi più svariati. Sapete che io sono una che di norma ama variare sovente, per cui questo prodotto mi sarà estremamente utile soprattutto in vacanza o in tutte quelle occasioni in cui non ho tempo né voglia di farmi le unghie.
Insomma, credo che dopo lo Shellac, CND abbia messo a segno un altro colpaccio.
E anche per oggi è tutto, grazie per l'attenzione e a presto!

In conclusion: according to my experience, do I recommend Vinylux? Yes, expecially to those ladies who don't like to change their nail colour often but at the same time don't want to use semipermanent nail polishes for many different reasons (time, costs, etc.).
You know that I'm that kind of girl who loves to play with colours and change polish quite often, but I think that Vinylux will be very useful for me too, i.e. during holiday, when I don't have the time to do my nails every three or four days, or during busy work periods.
Briefly, I think that Vinylux is another epic win for CND, after the big success of Shellac.
And that's all I have for you today, thank you for reading and watching and have a nice evening!


***CND è distribuita da Ladybird House, che mi ha inviato i prodotti del post a scopo valutativo. Per maggiori informazioni sui prodotti e su dove acquistarli consultate il loro sito.***
***Products in this post were sent me for review by CND Italian distributor***


domenica 7 luglio 2013

Review: Essence Nail Art Peel Off Base Coat

Buona domenica a tutte!
Stasera per me sarà una serata dedicata allo sport, tra il Gran Premio di Formula1 e la partita di World League tra Serbia e Italia, per cui anticipo il post del giorno rispetto ai miei orari standard.
Oggi è il turno di uno dei prodotti più chiacchierati degli ultimi mesi, la Nail Art Peel Off Base Coat di Essence, uscita nella linea permanente con l'assortimento dello scorso settembre ma già introdotta nel mercato grazie alla collezione in edizione limitata Ready for Boarding di un anno fa.

Happy Sunday ladies! 
Are you having a nice week-end? Yesterday I spent all day at the swimming pool, too hot and sultry to do anything else! 
And today I'm going to talk you about one of the most interesting products launched in the last months, that's Nail Art Peel Off Base Coat by Essence. This base coat is part of their permanent line since last September but it was already introduced in the market as a part of the limited edition collection Ready for Boarding for Summer 2012.


Il mio rapporto con questa base, che promette di rimuovere lo smalto semplicemente sollevandolo e senza acetone, è stato a lungo di amore-odio: a volte funzionava, a volte no. Alla fine sono riuscita a trovare il modo di usarla correttamente, e così ora posso indossare tutti gli smalti glitter o textured che voglio, tanto so che con questa base sotto potrò rimuoverli senza troppi sforzi.
Il primo consiglio è abbastanza ovvio: stendetela sulle unghie perfettamente pulite, senza residui di sapone o acetone o creme idratanti. In caso contrario, la base non aderirà. Questa è una regola generale, ma vale più che mai con questo prodotto.
Secondo consiglio, direi fondamentale: stendetene uno strato molto abbondante. L'unghia dev'essere completamente bianca, come se aveste steso una mano di vernice. Per molto tempo, il fatto di aver applicato poco prodotto ha interferito con la felice rimozione del tutto. Non scordatevi del tip wrapping soprattutto in questo caso, visto che il prodotto tende a ritirarsi un po' asciugando.

My relationship with this base, which promises to remove the nail polish simply lifting and peeling it, has been difficult for a long time: sometimes it worked, sometimes it didn't. Quite frustrating.
In the end I finally understood how to use it properly, so now I can wear all glitter or textured polishes I want without spending hours for their removal. So, these are my tips for a correct use of this base.
First-of-all, make sure that your nails are perfectly clean before applying it, no soap or acetone or moisturizers residues. This is a general rule, but it's even more important with this kind of product. Otherwise, the base will not adhere to your nail.
Secondly: apply a very generous layer of this peel-off base. This is very important. Your nails should be completely white, as if you had applied a coat of paint on them.
At first I applied a quite thin coat of product, and this interfered with the successful removal of the nail polish. So don't be stingy! And don't forget to wrap your tips: this is very important since this base coat tends to shrink a bit when it dries.


Terzo: fatela asciugare completamente prima di applicare lo smalto prescelto. La base deve essere diventata completamente trasparente. Questo è un processo che ha una durata variabile, a seconda della temperatura ambiente, ma in genere a me occorrono almeno 20-25 minuti. Quando i tempi di asciugatura erano più rapidi, significava che non avevo applicato uno strato sufficientemente abbondante e che quindi avrei avuto difficoltà di rimozione. Essence dice di aspettare 10 minuti, in tutta onestà sono davvero troppo pochi. Non so da dove abbiamo pescato questo dato. Non siate impazienti, o rovinerete tutto.

Thirdly: let it dry completely before applying your coloured nail polish. Don't be impatient. When the product is completely dry, it becomes clear. How long does it take? It depends on the room-temperature, but generally it takes at least 20-25 minutes. When drying time was faster, it meant that I didn't apply an adequate quantity of product. Essence says to wait 10 minutes, but in all honesty I disagree with them!


In ultimo: Essence consiglia di non lavare le mani con acqua calda per almeno 3 ore dopo l'applicazione di questa base (consiglio peraltro contenuto nelle istruzioni in tedesco, francese ed inglese ma non in quelle in italiano...). Ammetto di essermi scordata di questa avvertenza in alcuni casi, mi è capitato di lavare i piatti dopo un paio d'ore, ma non ho notato particolari controindicazioni. Comunque, per dovere di cronaca, includo anche questa nota.
La rimozione, poi, sarà molto semplice: sarà sufficiente partire dalla base dell'unghia, o dai lati della stessa, ed iniziare a sollevare lo smalto con un bastoncino d'arancio. Vi consiglio di guardare questo video di Simona per avere un'idea di quanto sia tutto davvero semplice e veloce.
Menzione d'onore per il furbisssssssimo packaging: la boccetta è contenuta in una scatolina aperta sia sopra che sotto, così quando andate ad afferrarla è quasi matematico che vi cada per terra. Ed in effetti in questi mesi di boccette rotte e ripiazzate sullo stand Essence senza colpo ferire ne ho viste parecchie...
E anche per oggi è tutto, spero di esservi stata utile, corro a finire l'editing del mio video in modo da poterlo pubblicare domani. Buona serata!

The final note: Essence says you should not wash your hands with warm or hot water for at least 3 hours after application of the base. I must admit I forgot this warning in some cases, sometimes I washed dishes after one or two hours, but I didn't noticed any particular contraindications.
Anyway, maybe it's better if you don't take a super hot shower one hour after the application of this product!!
Then, the funny part: the removal! It will be very simple and fast: you should start from the base or from the sides of your nail, and simply lift the polish with a woodstick and then peel it off. I recommend this video by Simona to have a better idea of ​​how it works.
Honorable Mention for the very idiot packaging which has empty top and empty bottom! Beware not to make it fall and be sure nobody else made it fell before you. In these months I've seen a lot of broken bottles in the exhibitors.
And that's all I have for you today, I hope this review has been helpful. I have to hurry up because I have to finish the editing of my next video before the start of Formula1 Grand Prix (since last March, here in Italy you have to pay crazy prices if you want to watch Formula1 live, so I simply wait a few hours and watch the recorded broadcast for free). 
As usual, thank you for reading and watching, have a nice evening and talk to you soon!

venerdì 5 luglio 2013

Holothon #03: Jade Delirio Rosa

Buonasera signorine!
Puntata #03 della nostra holothon, direi che è ormai ora di portarvi con me in Brasile! Lo smalto di oggi è infatti Delirio Rosa del brand verde-oro Jade. Quando si dice un nome, una garanzia...!
Delirio Rosa è il classico rosa Big Babol con un effetto holo linear piuttosto evidente. Ovviamente non c'è stato verso di catturare completamente la sua olograficità con la fotocamera (né coi due cellulari), cosa che mi ha fatto sclerare non poco. Comunque, le mie foto rendono piuttosto bene l'idea di come questo smalto appaia; aggiungeteci giusto, con un po' di fantasia, un pizzico di effetto LSD.
La formula è fantastica, lo smalto si applica quasi da solo; l'unico difetto è che l'odore non è proprio il massimo: colpa del toluene presente nell'INCI. Due mani per la coprenza perfetta e tempi di asciugatura nettamente superiori a quelli degli holo linear classici, ma comunque abbastanza rapidi.
D'altro canto questo smalto promette molto bene a livello di durata, è vero che lo porto da solo 24 ore, ma non si è ancora minimamente consumato in punta o sugli angoli, cosa che invece mi è accaduta ad esempio coi Layla o gli Nfu Oh. UPDATE: questo smalto ha una durata eccellente!
La cosa curiosa di questo smalto è che è talmente lucido anche senza top coat che sembra di avere un sottilissimo strato di vinile rosa strobo sulle unghie... Fantastico!
E anche per oggi è tutto, vi auguro un buon week-end! Il mio sarà dedicato alla piscina e alla Formula 1, ma non mi dimentico di voi, ho in cantiere un articolo corposo per domenica e sto anche finendo di editare un nuovo video, per cui rimanete sintonizzate!

Hi ladies!
Third post of our Holothon, do you want to come with me to Brazil?!? The nail polish of the day, Delirio Rosa, is from the brazilian brand Jade. Its name is a guarantee!

Delirio Rosa is a classic Barbie pink with a strong holo linear effect. It was impossible to capture all the beauty of this crazy rainbow effect, I tried with my camera, with my smartphone, with the mobile phone of my boyfriend but... No way! So, please use your fantasy to add a touch of holographic powder to my pics, and you will have a better idea of how this polish looks in real life.
Formula is great and application is super easy; its smell is a bit strong, I think this is due to the presence of toluene in its INCI. Two coats for the perfect coverage, and it dries slower compared to classic holo polishes. I've been wearing it for 24 hours, so I can't say a lot about its longevity; anyway, it is still perfect, I think it will last a lot more than Laylas or Nfu Ohs. UPDATE: Delirio Rosa has an incredible longevity too!
A curious thing about this nail polish is that it seems you have a thin coat of bright pink vinyl on your nails, since it is really, really glossy and shiny... I love it!
That's all I have for you today, hope you will have a super nice week-end! I'm going to spend the next two days at the swimming pool and watching Formula 1. But I'm going to work on a very long article for the blog too, and I'm going to work on a new video too. So, stay tuned!


Applicazione / Application
5/5
Asciugatura / Drying time
3.5/5
Coprenza / Pigmentation
4.5/5
Durata / Longevity
4.5/5
GIUDIZIO FINALE / OVERALL
4.5/5


mercoledì 3 luglio 2013

ABC Challenge 2013, the final post: Z for Zoya Liberty

Hi ladies!
Here we are with the final post of our ABC Challenge 2013. First-of-all, I'd like to thank Kimber and all the amazing ladies who have participated with enthusiasm. Your amazing posts and creations pushed me to do better than usual, to use more fantasy for my entries. I wish I could do more during this challenge, but times is a hard master!
So... Thank you so much ladies!!! I'm so proud to be part of this wonderful group!
For the final post I picked a very special polish, Zoya Liberty from recent Pixie Dust for Summer 2013 Collection. I'm deeply in love with it, I can find the words to describe how stunning it is!
Liberty is a bold cerulean blue with a sand finish. The color is enriched with bright and sparkly blue particles. This incredible sparkle is so hard to capture with pictures! IRL it is much better, trust me.
Application is easy and fluid, two coats for the perfect coverage. It took a bit to dry, but nothing tragic. Considering that I didn't apply a top coat over it, and considering its particular finish, its longevity is quite good (four days before chipping).
As I wrote on my Facebook page, on Twitter and maybe even here, I have a weakness for textured/sand polishes. I have three Zoyas, one OPI and mmm... Maybe 6 Kikos??? But I want more! Textured polishes are my new drug!
And that's all I have for you today, thank you for following me/us during this adventure and have a nice evening!

Ciao ragazze!
Ultimo post per la nostra ABC Challenge internazionale. E' stata una bellissima esperienza, ho conosciuto tante bloggers simpatiche e di talento, che mi hanno spinto a fare sempre meglio. Anzi, avrei voluto fare di più, ma il tempo è davvero tiranno.

Ma grazie anche a tutte voi che avete letto i nostri post!
Per questa ultima puntata ho scelto uno smalto davvero speciale, lo Zoya Liberty della recente collezione Pixie Dust for Summer 2013. Sono perdutamente innamorata di questo smalto, è davvero splendido. Si tratta di un color ceruleo davvero carico, con centinaia di particelle luminose di una tonalità di azzurro più chiara della base. E questa brillantezza è davvero impossibile da catturare a modo in foto, nella vita reale è molto più accentuata.
L'applicazione è semplice e fluida e sono sufficienti due passate per la coprenza perfetta. I tempi di asciugatura non sono rapidissimi, d'altro canto non si può contare sull'ausilio di un top coat, ma comunque nulla di particolarmente noioso, un quarto d'ora/venti minuti sono più che sufficienti.
Anche la durata è più che soddisfacente.
Come ho già scritto nella mia pagina Facebook, su Twitter e forse anche qua, io vado pazza per gli smalti materici, textured, sand o come vi pare. Ho già tre Zoya, un OPI e mmm... Forse 6 Kiko? E nemmeno mi bastano, ne voglio altri! I textured sono la mia nuova droga!
E anche per oggi è tutto, vi abbraccio e vi dò appuntamento a prestissimo!


Applicazione / Application
5/5
Asciugatura / Drying time
3.75/5
Coprenza / Pigmentation
4.5/5
Durata / Longevity
3.75/5
GIUDIZIO FINALE / OVERALL
4.25/5

martedì 2 luglio 2013

Golden Rose Jolly Jewels #121

Ciao a tutte!
Oggi vi travolgo con una marea di festosissimi glitter, grazie al Golden Rose Jolly Jewels #121 (speditomi gentilmente da Anne di Polishinail).
Questo smalto, in realtà, lo puntavo da parecchio, perché mi sembrava una versione assai più economica dell'Orly Flash Glam Rockets Red Glare. Ed in effetti non sbagliavo.
In ogni caso, il Jolly Jewels #121 è un festosissimo mix di glitter rossi di diverse forme e dimensioni in base trasparente. Nelle mie foto potete vedere il risultato di una (sì, signore mie, una sola) passata sopra una mano di Orly Liquid Vinyl. Insomma, vi sarete accorte che la quantità di particelle glitterose contenute in questo smalto è davvero generosa!
Si applica senza problemi ed asciuga molto velocemente, con un aspetto leggermente opaco, ma con una mano di top coat tirerete fuori tutta la brillantezza dei glitter. Molto festiva come manicure, non trovate? Avrei dovuto chiamarla "Merry and Bright, Christmas in July"!
E anche per oggi è tutto, a domani con l'ultima puntata della nostra ABC Challenge internazionale!

Hi ladies!
Today's post is full of glitter particles! I'm going to show you Golden Rose Jolly Jewels #121 (which was kindly sent me by Anne from Polishinail), a triumph of bright red glitters of different shapes and dimensions in a clear base.

This polish had been in my wishlist for a while, because it's really similar to Orly Rockets Red Glare from Flash Glam FX Collection, but it's a lot cheaper.
In my pics, you can see how one coat of Jolly Jewels #121 looks over one coat of Orly Liquid Vinyl. Yes ladies, only one coat! A very generous amount of glitters, don't you think?
It applies easily and it dries fast, with a semi-matte aspect; for this reason I highly suggest the use of a top coat above it, so you can admire all the shine of its glitter particles.
A very festive manicure! Maybe I should have called this post "Merry and Bright, Christmas in July"!
That's all I have for you today, thank you for reading and watching and see you tomorrow with the last post of our ABC Challenge!


Il mio codice sconto su Polishinail (8% su tutta la merce esclusi i sets): CRISTINA-8
My discount code on Polishinail (8% off on all items, sets excluded): CRISTINA-8

***Il prodotto del post mi è stato inviato a scopo recensione***
***Product in this post was sent me for review***