Ads 468x60px

Visualizzazione post con etichetta ABC Challenge 2013. Mostra tutti i post

mercoledì 3 luglio 2013

ABC Challenge 2013, the final post: Z for Zoya Liberty

Hi ladies!
Here we are with the final post of our ABC Challenge 2013. First-of-all, I'd like to thank Kimber and all the amazing ladies who have participated with enthusiasm. Your amazing posts and creations pushed me to do better than usual, to use more fantasy for my entries. I wish I could do more during this challenge, but times is a hard master!
So... Thank you so much ladies!!! I'm so proud to be part of this wonderful group!
For the final post I picked a very special polish, Zoya Liberty from recent Pixie Dust for Summer 2013 Collection. I'm deeply in love with it, I can find the words to describe how stunning it is!
Liberty is a bold cerulean blue with a sand finish. The color is enriched with bright and sparkly blue particles. This incredible sparkle is so hard to capture with pictures! IRL it is much better, trust me.
Application is easy and fluid, two coats for the perfect coverage. It took a bit to dry, but nothing tragic. Considering that I didn't apply a top coat over it, and considering its particular finish, its longevity is quite good (four days before chipping).
As I wrote on my Facebook page, on Twitter and maybe even here, I have a weakness for textured/sand polishes. I have three Zoyas, one OPI and mmm... Maybe 6 Kikos??? But I want more! Textured polishes are my new drug!
And that's all I have for you today, thank you for following me/us during this adventure and have a nice evening!

Ciao ragazze!
Ultimo post per la nostra ABC Challenge internazionale. E' stata una bellissima esperienza, ho conosciuto tante bloggers simpatiche e di talento, che mi hanno spinto a fare sempre meglio. Anzi, avrei voluto fare di più, ma il tempo è davvero tiranno.

Ma grazie anche a tutte voi che avete letto i nostri post!
Per questa ultima puntata ho scelto uno smalto davvero speciale, lo Zoya Liberty della recente collezione Pixie Dust for Summer 2013. Sono perdutamente innamorata di questo smalto, è davvero splendido. Si tratta di un color ceruleo davvero carico, con centinaia di particelle luminose di una tonalità di azzurro più chiara della base. E questa brillantezza è davvero impossibile da catturare a modo in foto, nella vita reale è molto più accentuata.
L'applicazione è semplice e fluida e sono sufficienti due passate per la coprenza perfetta. I tempi di asciugatura non sono rapidissimi, d'altro canto non si può contare sull'ausilio di un top coat, ma comunque nulla di particolarmente noioso, un quarto d'ora/venti minuti sono più che sufficienti.
Anche la durata è più che soddisfacente.
Come ho già scritto nella mia pagina Facebook, su Twitter e forse anche qua, io vado pazza per gli smalti materici, textured, sand o come vi pare. Ho già tre Zoya, un OPI e mmm... Forse 6 Kiko? E nemmeno mi bastano, ne voglio altri! I textured sono la mia nuova droga!
E anche per oggi è tutto, vi abbraccio e vi dò appuntamento a prestissimo!


Applicazione / Application
5/5
Asciugatura / Drying time
3.75/5
Coprenza / Pigmentation
4.5/5
Durata / Longevity
3.75/5
GIUDIZIO FINALE / OVERALL
4.25/5

mercoledì 26 giugno 2013

ABC Challenge: Y for Sinful Colors You Just Wait

Hi ladies!
Second to last letter of our polished marathon. Can you believe it?
Y is probably one of the toughest letter of the alphabet, but luckily I found You Just Wait by Sinful Colors in my stash!
I have to say that I'm not a huge fan of this polish: in the bottle it looks like a nice light pink with a strong gold duochrome effect. But it's really, really sheer. I wanted to show it alone on my ring finger, but after four coats my nail line was still visible so I gave up. I decided to layer one coat of You Just Wait over two coats of Chanel Vendetta, a super dark purple with a very subtle shimmer, and I really like a lot the final effect!
The main color is green, but it also has a strong brown/burgundy/bronze duochrome effect. Unfortunately brushstrokes are very evident, and this is a pity!
And now I'm going to take a look at the entries of the other awesome ladies of this challenge, thank you for reading and watching and have a nice evening!

Ciao a tutte!
Penultima puntata della nostra ABC Challenge, da non credere!

La Y è forse una delle lettere più "antipatiche" dell'alfabeto per me, per fortuna sono riuscita a riesumare da un cassetto dell'Helmer il Sinful Colors You Just Wait, salvataggio in corner!
Devo ammettere di non essere una grande fan di questo smalto: nella bottiglia appare come un superfemminile e delicato rosa con un forte effetto duochrome dorato. Ma non ci provate nemmeno a metterlo da solo, è super sheer. Volevo mostrarvelo sull'anulare, ma dopo quattro passate e la linea dell'unghia ancora visibile ho rinunciato. Allora l'ho layerizzato sopra lo Chanel Vendetta, e la musica cambia completamente!
Nelle mie foto, una mano di You Just Wait sopra due di Vendetta, ed ecco qua che esce fuori un verde predominante con un bellissimo effetto duochrome marrone/bronzo/borgogna.
Purtroppo i segni del pennello sono evidentissimi, mannaggia!
E anche per oggi è tutto, corro a sbirciare cosa hanno combinato le altre donzelle, vi abbraccio e vi dò appuntamento a venerdì con un altro holo!


mercoledì 19 giugno 2013

ABC Challenge: X for Sally Hansen Xtreme Wear Emerald City [ft. BPS studs]

Hi ladies!
Today's post is about letter X, maybe the most difficult of the entire alphabet! I really didn't know what to do, so I picked a Sally Hansen polish from Xtreme Wear serie.
Emerald City is a beautiful and bright kelly green with a subtle shimmer finish. Formula is a bit runny but application is not that bad. Two coats for the perfect coverage, it dries fast and has a good longevity too.
Definitely a super nice polish but... Be careful!!! It stains a lot on the nails! I suggest two coats of your favourite base before applying Emerald City.
I wanted to spice up my manicure so I decided to add some studs from my Born Pretty Store set. This set contains silver and gold studs with different shapes and sizes, but for this manicure I used the golden ones because I love the combo green+gold.
Yesterday I showed a preview of this mani to Simona, and she told me that it's very festive and Christmassy!!! I know that she's perfectly right, gold+green is a tipical Christmas color combo, but I'm very good at arguing that black is white, so this is my alternative explanation to my manicure: actually, in Brazil, there's a football tournament called Confederations Cup. The Brazilian national football team is also called Green and Gold (at least here in Italy)... So I want to dedicate this manicure to this event!!!
And that's all I have for you today, thank you for reading and watching and have a nice evening!

Ciao ragazze!
Siamo arrivate alla lettera X della nostra challenge. X vuol dire panico puro, altrimenti detto: "E mò che mi invento?". Sono andata sul facile scegliendo Emerald City di Sally Hansen, della linea Xtreme Wear.
Emerald City è uno splendido verde trifoglio con un leggero effetto shimmer tono su tono. Coprente in due passate, asciuga in fretta e dura a lungo. La formula è un tantino liquida, ma non rende particolarmente difficoltosa l'applicazione. Purtroppo macchia un sacco le unghie, quindi straconsiglio di mettere due mani di base prima di applicare il colore.
Volevo rendere più sfiziosa la mia manicure e ho deciso di applicare delle borchiette dal mio kit di Born Pretty Store. Questo set contiene applicazioni sia argentate che dorate di diverse forme e dimensioni; io ho optato per le borchiette dorate perché adoro la combo verde+oro.
Dopo aver mostrato in anteprima la mia manicure a Simona, lei mi ha fatto notare che era molto natalizia... E come darle torto, d'altro canto? Ma io sono campionessa mondiale di arrampicata sugli specchi nonché di supercazzola avanzata, per cui ve la spiega altrimenti: sapete che in questi giorni, in Brasile, c'è un torneo chiamato Confederations Cup. La nazionale di calcio brasiliana è anche chiamata "verde-oro". Et voilà! La spiegazione rimaneggiata è servita!!!
E anche per oggi è tutto, gentili donzelle che mi rendete felice leggendo e commentando i miei post, vi abbraccio e vi dò appuntamento a presto!


Applicazione / Application
4/5
Asciugatura / Drying time
4.5/5
Coprenza / Pigmentation
4.5/5
Durata / Longevity
4.5/5
GIUDIZIO FINALE / OVERALL
4.5/5

***Il set di decorazioni unghie mi è stato inviato da Born Pretty Store. Lo smalto è stato acquistato da me***
***The nail decoration set was sent me for review by Born Pretty Store Staff. Emerald City was bought by me***


mercoledì 12 giugno 2013

ABC Challenge: W for W7 Cosmic Blue

Hi ladies!
I had big plans for letter W... I wanted to create a water marble or a watercolor manicure with a different technique from my usual one, but I had a problem: I didn't have the time!
I'm really sorry for this, I really need to create a nail art...
Anyway, for letter W I picked an amazing nail polish, W7 Cosmic Blue. This polish had been in my untrieds box for almost one year and I can't understand why I waited for so long before wearing it.
W7 Cosmic Blue has a very sheer light blue base with tons and tons of bright light blue glitters. It also contains a few green and silver glitter particles. Three coats in my pics, it applies very easily but it took a while to dry.
I love the final effect on my nails, so sparkly! I hadn't worn a glitter for much time, which is really weird for me.
And that's all I have for you today, don't forget to check the picks of the other ladies!
Ops, I forgot: which nail art would you like to see in the next days? I'd like to do another YouTube video but I don't know what to choose. Please, tell me in the comments! Thank you and have a nice evening!

Ciao ragazze!
Avevo grandi piani per la lettera W, ero indecisa tra una water marble arcobalenosa e una watercolors con una tecnica differente dalla mia solita, ma ho avuto un problema: il tempo!!!
Faccio una fatica obesa a star dietro a tutto, purtroppo la quantità di idee che mi frulla nel cervello è inversamente proporzionale al tempo che ho per realizzarle. Uff. Comunque, ho compensato alla delusione indossando il W7 Cosmic Blue, che mi fissava da tempo dal cumulo di untrieds implorandomi di sceglierlo. Era tempo che non indossavo uno smalto glitter puro, e questo spacca davvero!
Ha una base molto sheer azzurra, ed è composto da una miriade di glitter azzurri e qualcuno verde ed argento. Tre mani nelle mie foto, applicazione impeccabile ma tempi di asciugatura un po' lunghi.
Adoro il risultato sulle unghie, specialmente col bel sole di questi giorni, davvero scintillante!
E anche per oggi, mie donzelle, è tutto. Vi lascio con un "compito per casa": mi suggerireste, nei commenti, una nail art da fare a breve? Magari anche col video tutorial? Grazie mille e buona serata!


mercoledì 5 giugno 2013

ABC Challenge: V for Velluto [ft. Essence Mission Flower - Guerilla Gardening TE]

Hi ladies!
Today's post is about letter V, so I decided to show a velluto manicure! Velluto is the Italian word for velvet, and of course "manicure velluto" is how we call fuzzy or velvet manicure.
It's the first time that I try this kind of nail art, I have always been very curious but I wasn't sure if I liked the final effect or not! But when I found a brand new stand of Guerilla Gardening TE by Essence, which also includes two nail effect powders for velvet manicure, I decided to buy them and give them a chance.
Here I used the pink one, Mission Flower, over its namesake nail polish.
We all know that this kind of manicure lasts only a few hours but it could be a nice choice for a special night out.
Essence has been a bit mean, the powder container is reeeeally tiny, but you need only a few product for a complete manicure, so it's not that bad. 
To be completely honest, I still don't know if velvet manicure is a yay or nay for me. On the contrary, I'm sure about my feelings for Mission Flower, and now I'm talking about the nail polish... I love it!
I'm mad about this kind of super bright pink with a strong blue undertone. Moreover, it's highly pigmentated (one thick coat in my pics), it dries super fast and very glossy and formula is great.
And that's all I have for you today, see you soon and have a nice evening!

Ciao ragazze!
Per la lettera V mi gioco la manicure velluto, che non avevo mai provato ancora (ma come sono poco trendy). In realtà non mi aveva mai convinta fino in fondo, ma quando Essence ha tirato fuori, con la collezione Guerilla Guardening, due polverine adatte a questo scopo... Non ho resistito!

Le ho prese entrambe, ma oggi vi mostrerò la tonalità Mission Flower, un rosa fuchsia (l'altra si chiama I'm the moss ed è un verde erba). L'ho utilizzata sopra il suo omonimo smalto.
Sappiamo tutte che questa manicure è destinata a vita breve, ma per una serata speciale fa sempre la sua porca figura!
Devo dire che Essence è stata tirchietta, il barattolino è davvero piccolo, ma d'altro canto basta davvero pochissima polvere per una manicure completa. Promossissima l'imboccatura "apri e chiudi", davvero pratica. 
Ora che l'ho vista "in azione", non sono ancora sicura di sapere se la manicure velluto fa per me. Al contrario, sono certissima di amare alla follia lo smalto abbinato alla polverina, Mission Flower. Impazzisco letteralmente per questi fuchsia vibranti con forte sottotono blu. E poi qui la qualità è ineccepible: pigmentazione elevatissima (solo una passata carica nelle mie foto), asciugatura rapidissima, finish finale incredibilmente lucido e formula impeccabile.
E anche per oggi è tutto, buona serata e a presto!


mercoledì 29 maggio 2013

ABC Challenge: U for Essence Underwater

Hi ladies!
Are you ready for letter U? I must admit I wasn't! I have only a few polishes whose names begin with letter U; moreover, in this last period I don't have the time to create a nail art.
So I picked an old shade by Essence, which is called Underwater. There are two versions of this polish: both are currently discontinued, both had the same name and the same numerical code but they looked completely different!
Anyway, the oldest Underwater is a beautiful, vibrant and bright blue with a shimmery frost finish. Great formula, application is easy and fast. Pigmentation is good, two coats in my pics.
It dries fast and has a good longevity too.
Underwater is a little and cheap jewel, I'm so happy I have it in my stash. That's why I love Essence: they create beautiful and quality polishes with small prices.
That's all I have for you today, thank you for reading and watching and have a nice day!

Ciao ragazze!
Pronte per la U? Io non lo ero. Ho pochissimi smalti che iniziano per questa lettera ed appartengono a brand che ho già proposto per questa challenge e volevo evitare il "doppione" (fisse maniaco-perfezioniste). Non avendo assolutamente tempo per una nail art, mi sono dovuta rassegnare e, quindi, ecco a voi l'Essence Underwater.

Esistono due versioni di questo smalto ed entrambe sono fuori produzione. Pur avendo stesso nome e codice numerico, sono colori completamente diversi.
Il mio è l'Underwater più vetusto ma lo trovo comunque splendido. E' un blu/azzurro molto intenso con un finish shimmer/frost. Si applica assai scorrevolmente, asciuga in fretta e ha anche una buona durata. Due passate nelle mie foto.
Insomma, Underwater è uno di quei gioiellini che mi fanno ricordare perché io ami tanto Essence!
E anche per oggi è tutto, vi auguro una splendida giornata e a presto!


Applicazione / Application
5/5
Asciugatura / Drying time
4.5/5
Coprenza / Pigmentation
4.25/5
Durata / Longevity
4.5/5
GIUDIZIO FINALE / OVERALL
4.5/5


mercoledì 22 maggio 2013

ABC Challenge: T for Color Club Tangerine Scream

Hi ladies!
Oh my God, I can't believe we are already to letter T!
Anyway, I'm sooooo happy that here in North Italy the weather is a bit better and I finally can wear a neon polish.
Today I'm going to show you Color Club Tangerine Scream, a stunning orange neon shade from Electro Candy Collection for Summer 2009.
Tangerine Scream also has a gorgeous and unusual (for a neon polish) light shimmer. It dries matte so I applied a top coat for my pics. I did three coats of product for every nail, except for my ring finger where I used one coat of Orly Dayglow and two coats of Tangerine Scream.
This polish is a bit on the sheer side, after three coats my nail line was still a bit visible. But I don't mind, its formula is absolutely perfect, it applies easily and evenly. It also dries quite fast and has a good longevity.
That's all I have for you today, thank you for reading and watching and have a nice evening!

Ciao ragazze!
Mi sembra incredibile di essere già arrivate alla lettera T. Finalmente questa primavera avara di sole ha deciso di concederci qualche giorno di tepore, e ovviamente io mi sono precipitata ad indossare uno smalto neon che non vedevo l'ora di mostrarvi, il Color Club Tangerine Scream (collezione estate 2009 Electro Candy).
Tangerine Scream è un arancio abbagliante con la particolarità di essere anche shimmer. Come tutti i neon asciuga con un finish satin-matte, per cui ho applicato un top coat per le foto. Tre passate per ogni unghia, fuorché sull'anulare, dove ho layerizzato due mani di Tangerine Scream sopra una di Orly Dayglow. Insomma, avrete capito che è un tantinello sheer (controluce si può "apprezzare" la linea dell'unghia laddove non c'è la base bianca). Compensa con una formula fantastica, a dir poco perfetta, un'asciugatura rapida e una durata molto buona.
E anche per oggi è tutto, a presto e buona serata!


Applicazione / Application
5/5
Asciugatura / Drying time
4.5/5
Coprenza / Pigmentation
3/5
Durata / Longevity
4.5/5
GIUDIZIO FINALE / OVERALL
4.25/5


mercoledì 15 maggio 2013

ABC Challenge: S for Swirl Water Marble

Hi ladies
and welcome back to our polished marathon! I had a lot of ideas in my mind for letter S. In the end, I decided to create a Swirl Water Marble!
As you probably know, I'm one of the hugest fan of this technique: it's not easy, it's time consuming, you waste a lot of polish but... The final result is stunning. You can play with lots of colors, finishes and designs, and each nail has a unique pattern.
Here I used Dragon and Lady of the Lake, two gorgeous shades by A England. Dragon is a forest green with a hint of gold and a holo scattered finish. Lady of the Lake is a perfect intense purple and has a holo scattered finish too.
They work perfectly for this technique, they easily spread in the water. 
I love the final result, and I hope you like it too!
A general, final note: I've recently made a video with tips and tricks for water marbling. Many readers write me to ask my help with this nail art, so I decided to do a sort of video guide. In Italian, of course. Now I don't know what to do with this video! Should I add English subs? Should I even upload it?
I'm a very chatty and friendly person, but I'm soooo embarassed about this. I've already appeared on television, I was interviewed by some local radios and newspapers, but it was for work reason. This is something different. I don't think I'm ready for You Tube!!!
Well, sorry for this digression. As usual, thank you for reading and watching and... Have a nice day!

Ciao ragazze,
e ben ritrovate con la nostra ABC Challenge. Avevo un sacco di idee phaighe per questa lettera S, ma alla fine mi sono lanciata in una swirl (spirale) water marble.
Come probabilmente saprete, sono una grande fan di questa tecnica; che è sì complicata, porta via un sacco di tempo, mette a dura prova la vostra pazienza, ma consente di ottenere risultati spettacolari, ogni volta diversi. Dà la possibilità di giocare con un'infinità di colori e pattern e, grazie ad essa, ogni unghia avrà, di volta in volta, un decoro unico.
Per la mia water marble a spirale ho usato Dragon e Lady of the Lake di A England. Il primo è un verde foresta con un tocco dorato, il secondo un viola intenso. Entrambi hanno finish holo scattered.
Inoltre, funzionano perfettamente per questa tecnica, dal momento che si aprono facilmente in acqua.
Amo follemente il risultato finale, e spero fortemente che piaccia anche a voi!
Considerazione finale: ho ricevuto (e ricevo) tante richieste di aiuto e consigli in materia di water marble. Alla fine, dopo tanto tempo, ho deciso di racchiuderli in un video. Di cui ora come ora non so cosa fare! Non so nemmeno se lo pubblicherò. 
Nonostante io sia una persona estroversa, allegra e caciarona, l'idea di mettermi in gioco su You Tube mi fa gelare il sangue nelle vene. Sono già apparsa in tv, sono anche stata intervistata da giornali e radio locali, ma era per lavoro. E' molto diverso. Insomma, per ora rimango ferma nel limbo. Vedremo!!!!
Scusate per questa digressione finale, vi ringrazio per la visita e vi auguro una splendida giornata!


mercoledì 8 maggio 2013

ABC Challenge: R for Reciprocal Gradient Nail Art

Hi ladies!
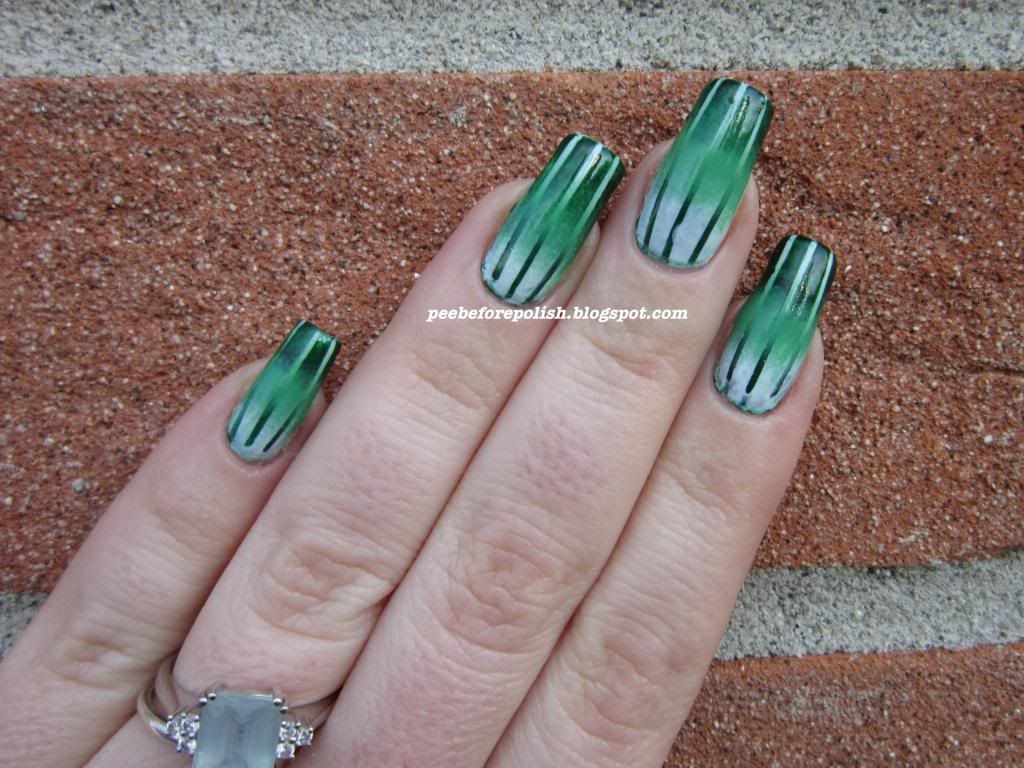
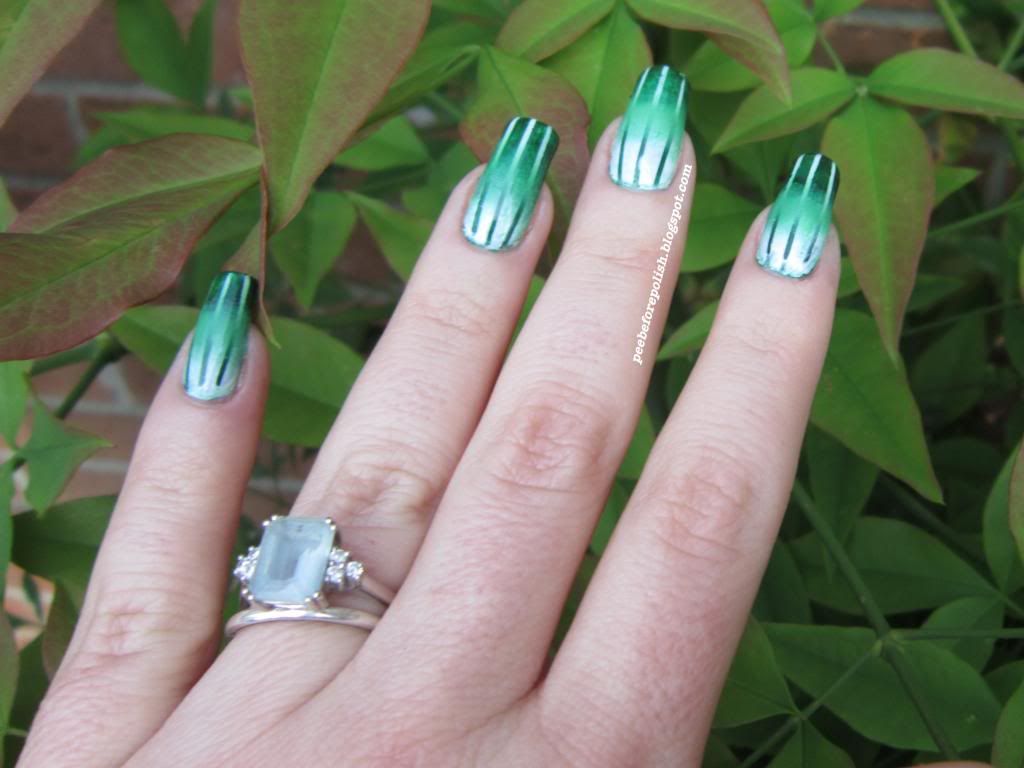
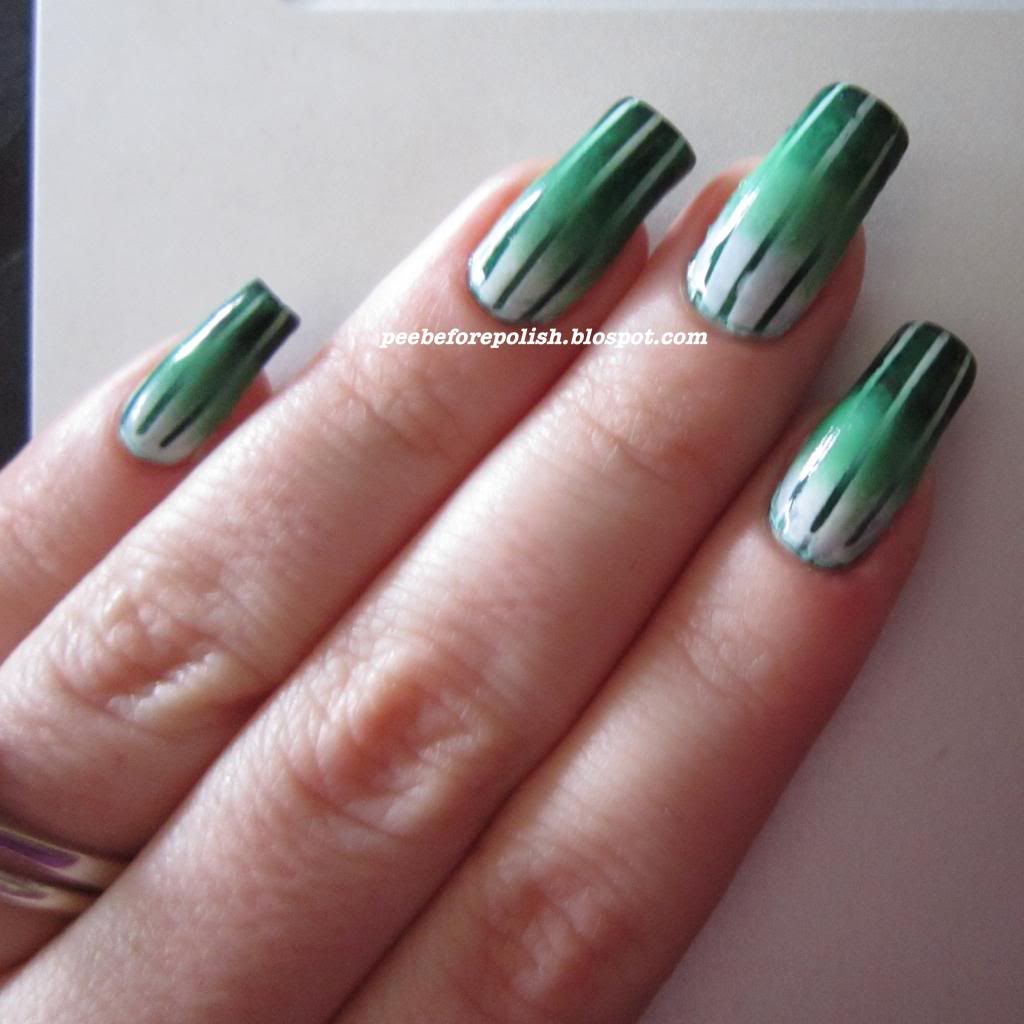
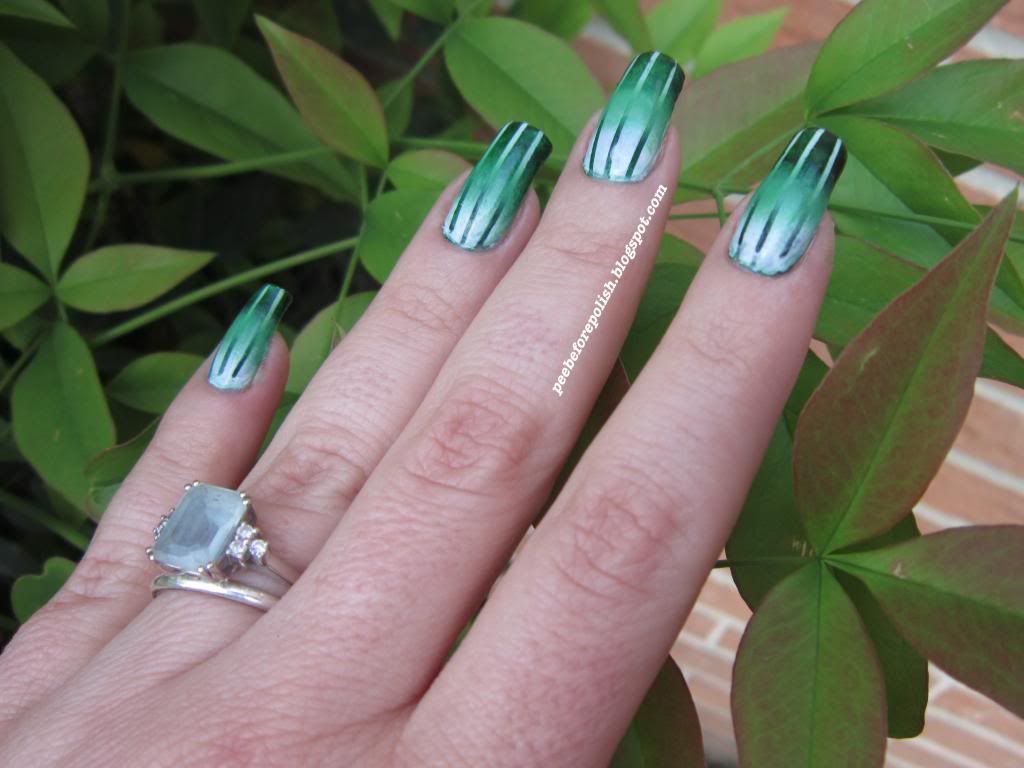
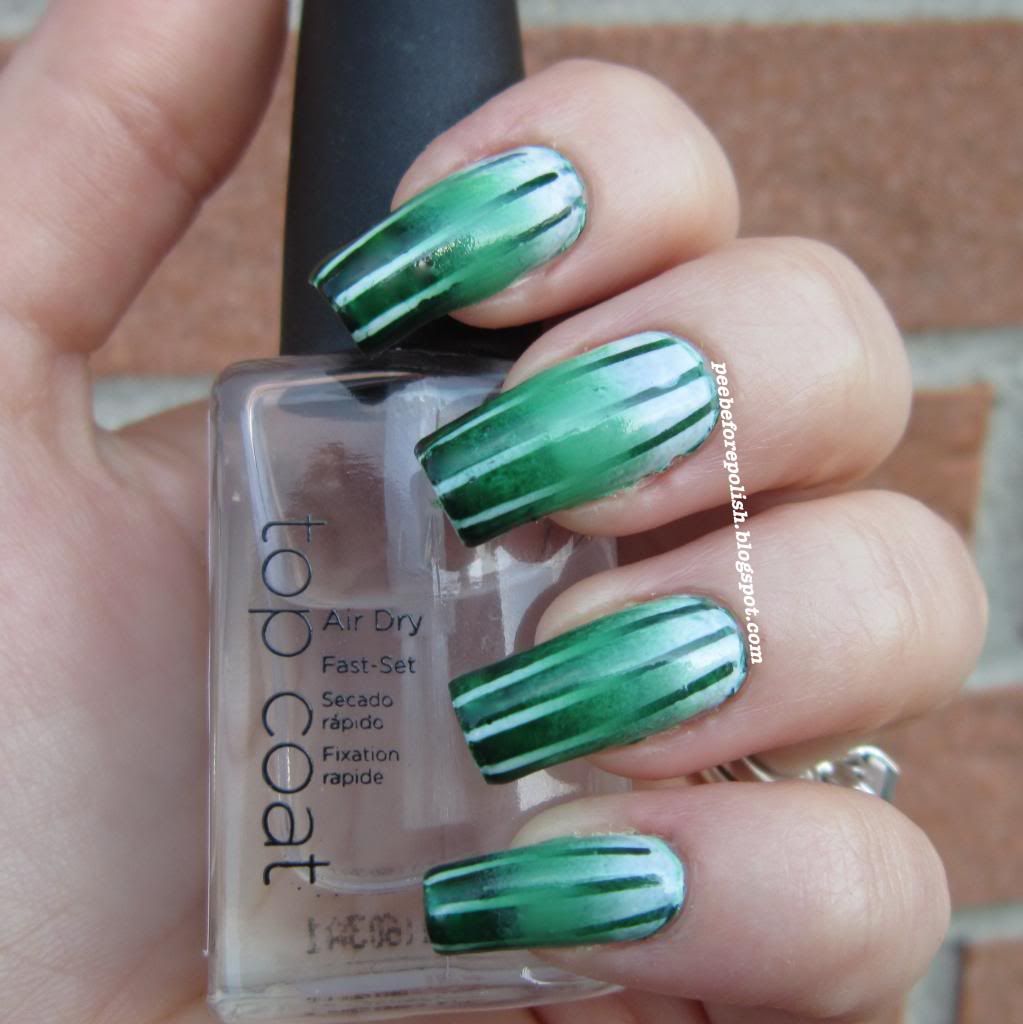
Today I'm going to show you a nail art which was inspired by this tutorial. Colette is probably my favourite youtuber ever, she's known as the Water Marble Goddess but she also creates other fabulous designs.
Anyway, for my version of Reciprocal Gradient nail art I decided to use green as predominant color. The dark green is Rampage by Illamasqua, the lighter green is Mojito Madness by Essie and I used a cheap polish by the Italian brand Chic for the white.
Since Colette did a perfect tutorial, I won't explain how I did this nail art, but I'd like to share a couple of considerations. This nail art is not that difficult, but it's really, really time consuming and you have to be extremely patient. Take your time. I will repeat it again: you'll need a LOT of time.
I think it looks best on long nails, but if you have medium nails you can try with two colors instead of three. I also think that the best results can be obtained with creme polishes: in my opinion it will be difficult to show a neat and clean gradient contrast with other finishes.
I really, really like the final result. Now I'd like to play with many other colors! Maybe blue, purple, pink or red...!
Hope you like it too, thank you for reading and watching and... Have a nice day!

Ciao ragazze!
Oggi vi propongo un'altra nail art che ho realizzato seguendo questo tutorial di Colette, conosciuta come regina indiscussa della water marble, ma che è bravissima anche con altri design.
Per la mia versione di Reciprocal Gradient ho deciso di usare il verde come colore predominante: il verde più scuro è Rampage di Illamasqua, il verde più chiaro è Essie Mojito Madness mentre per il bianco ho optato per l'italica ed economica Chic (una volta si trovava da Acqua&Sapone al solito prezzo di 0.99€, ma ormai non la vedo più da un pezzo).
Dal momento che c'è già un tutorial fantastico di Colette non mi dilungherò sul procedimento (anche se spero di farne uno a mia volta in italiano), ma vorrei aggiungere un paio di considerazioni. Non si tratta di una nail art difficilissima, ma per realizzarla servono un casino di tempo e pazienza. Lasciatemelo ripetere: se avete intenzione di riprodurla, prendetevi TANTO, TANTO tempo.

Credo altresì che sia una nail art che rende al meglio sulle unghie lunghe, se le avete medie provate semmai a giocare con due colori anziché tre. Infine, nella mia opinione è meglio usare smalti creme, dal momento che altri finish più "accessoriati" potrebbero non far rendere al meglio il dettaglio del contrasto delle due gradient.
A me il risultato finale ha fatto letteralmente impazzire, tanto da farmi indulgere nell'insano proposito di ricrearla in blu, rosso, rosa, viola...!
Spero sia piaciuta anche a voi, grazie per la visita e... Buona giornata!