Visualizzazione post con etichetta Water Marble. Mostra tutti i post
giovedì 2 aprile 2015
Happy Easter Nail Art
Buonasera a tutte!
Innanzitutto voglio scusarmi per essere incredibilmente indietro coi commenti, sono stati giorni impegnativi. Anche ora vado particolarmente di fretta, per cui, senza troppi fronzoli, ecco a voi la mia nail art pasquale!
Etichette:
Blue,
Illamasqua,
Nail art,
Purple,
SdP Plates,
Stamping,
Water Marble,
Zoya
domenica 15 giugno 2014
China Glaze Strawberry Fields [plus water marble accent nail]
Buona domenica a tutte!
Oggi vi mostro la manicure che avevo realizzato qualche mese fa come guest post per la nostra Ivana di Thenails.net.
Etichette:
A England,
China Glaze,
Nail art,
Pink,
Purple,
Shimmer,
Water Marble
giovedì 13 febbraio 2014
GOT Challenge #6: Valentine's! [Hearts Water Marble]
Hi ladies!
Today's theme for GOT Challenge is Valentine's, and I decided to create a heart shaped water marble! The original idea comes from this video by Colette.
Etichette:
Essence,
Illamasqua,
Nail art,
Pink,
Purple,
Water Marble
venerdì 13 dicembre 2013
Xmas Nails: Candy Cane Water Marble
Ciao a tutte!
Oggi vi mostro una nail art decisamente natalizia. Da un sacco di tempo volevo fare una candy cane, e ho optato per realizzarla con la tecnica water marble.
Etichette:
China Glaze,
Layla,
Nail art,
Water Marble
sabato 10 agosto 2013
Neon Lights: Neon Water Marble!
Ciao a tutte e buon sabato!
Quando Francine ha proposto un post a tema neon non ho potuto davvero esimermi, anche perché era da tanto tempo che desideravo creare una water marble neon.
E quindi eccoci qui: ho scelto di realizzare un semplice design a petalo, che comunque reputo di grande effetto. Per quanto riguarda i colori, invece, ho optato per un fucsia sparato di Layla, il Fluo Colour F05, e un blu spettacolare della Coral Prosilk, il #600 della linea neon.
E' stato difficilissimo catturare i colori in tutto il loro splendore, ci sono riuscita ma dal vivo sono persino più intensi!
Vi lascio alle mie foto e alle creazioni delle altre smaltare pazze, spero che la mia water marble vi piaccia, nel qual caso vi consiglio di rimanere sintonizzate perché è in arrivo il video tutorial!
Hi ladies and happy Saturday!
A few weeks ago Francine proposed us a post with neon as main theme... I couldn't refuse her invite! I immediately decided that I wanted to do a neon water marble so... Here it is!
I created a simple petal design, which is one of the basic patterns for water marbles but it's, IMO, beautiful. About the colors: I picked a super bright pink by Layla, Fluo Colour F05, and a stunning and intense blue by Coral Prosilk, #600 from Neon Collection.
It was so hard to capture all the brightness of these colours, I swear that they are even more vibrant in real life!
Hope that you like this creation, I did a video tutorial and I'm going to work on it during this week since I'm on holiday and I finally have more time to dedicate to my blog.
Thank you for reading and watching and have a nice evening!

Quando Francine ha proposto un post a tema neon non ho potuto davvero esimermi, anche perché era da tanto tempo che desideravo creare una water marble neon.
E quindi eccoci qui: ho scelto di realizzare un semplice design a petalo, che comunque reputo di grande effetto. Per quanto riguarda i colori, invece, ho optato per un fucsia sparato di Layla, il Fluo Colour F05, e un blu spettacolare della Coral Prosilk, il #600 della linea neon.
E' stato difficilissimo catturare i colori in tutto il loro splendore, ci sono riuscita ma dal vivo sono persino più intensi!
Vi lascio alle mie foto e alle creazioni delle altre smaltare pazze, spero che la mia water marble vi piaccia, nel qual caso vi consiglio di rimanere sintonizzate perché è in arrivo il video tutorial!
Hi ladies and happy Saturday!
A few weeks ago Francine proposed us a post with neon as main theme... I couldn't refuse her invite! I immediately decided that I wanted to do a neon water marble so... Here it is!
I created a simple petal design, which is one of the basic patterns for water marbles but it's, IMO, beautiful. About the colors: I picked a super bright pink by Layla, Fluo Colour F05, and a stunning and intense blue by Coral Prosilk, #600 from Neon Collection.
It was so hard to capture all the brightness of these colours, I swear that they are even more vibrant in real life!
Hope that you like this creation, I did a video tutorial and I'm going to work on it during this week since I'm on holiday and I finally have more time to dedicate to my blog.
Thank you for reading and watching and have a nice evening!

lunedì 3 giugno 2013
Guess who did her first YouTube video? Indovina chi c'è di nuovo su YouTube?
Ebbene sì. L'ho fatto. Il mio primo video YouTube è on line da qualche manciata di minuti. E io sto già sprofondando negli Inferi più remoti dalla vergogna!
So che la qualità video è quella che è, ma spero comunque di esservi utile. Vi ho racchiuso tutti i consigli e i trucchetti che mi sono venuti in mente sulla water marble, facendo attenzione a rispondere anche alle varie domande che mi sono state poste in questi mesi.
Ed ora vado a chiudermi in un grosso sacco nero della monnezza e ad auto-riciclarmi nel bidone dell'umido (almeno sono biodegradabile)!
Un abbraccio a tutte!
Oh my God. I did it. I've just uploaded my first YouTube video. And I'm so, so embarassed.
I'm still working on the English subtitles, it's a very long and boring job, but they should be available in a couple of hours so, if you're interested in watching it, stay tuned!
ENGLISH SUBTITLES ADDED! :)
I know that video quality isn't the best, but I don't own a professional camera.
Anyway, in this video I included all my tips and tricks for the creation of a nice water marble manicure. Hope it will be helpful!
Thank you for reading and watching and... Have a nice evening!
So che la qualità video è quella che è, ma spero comunque di esservi utile. Vi ho racchiuso tutti i consigli e i trucchetti che mi sono venuti in mente sulla water marble, facendo attenzione a rispondere anche alle varie domande che mi sono state poste in questi mesi.
Ed ora vado a chiudermi in un grosso sacco nero della monnezza e ad auto-riciclarmi nel bidone dell'umido (almeno sono biodegradabile)!
Un abbraccio a tutte!
Oh my God. I did it. I've just uploaded my first YouTube video. And I'm so, so embarassed.
ENGLISH SUBTITLES ADDED! :)
I know that video quality isn't the best, but I don't own a professional camera.
Anyway, in this video I included all my tips and tricks for the creation of a nice water marble manicure. Hope it will be helpful!
Thank you for reading and watching and... Have a nice evening!
mercoledì 15 maggio 2013
ABC Challenge: S for Swirl Water Marble
Hi ladies
and welcome back to our polished marathon! I had a lot of ideas in my mind for letter S. In the end, I decided to create a Swirl Water Marble!
As you probably know, I'm one of the hugest fan of this technique: it's not easy, it's time consuming, you waste a lot of polish but... The final result is stunning. You can play with lots of colors, finishes and designs, and each nail has a unique pattern.
Here I used Dragon and Lady of the Lake, two gorgeous shades by A England. Dragon is a forest green with a hint of gold and a holo scattered finish. Lady of the Lake is a perfect intense purple and has a holo scattered finish too.
They work perfectly for this technique, they easily spread in the water.
I love the final result, and I hope you like it too!
A general, final note: I've recently made a video with tips and tricks for water marbling. Many readers write me to ask my help with this nail art, so I decided to do a sort of video guide. In Italian, of course. Now I don't know what to do with this video! Should I add English subs? Should I even upload it?
I'm a very chatty and friendly person, but I'm soooo embarassed about this. I've already appeared on television, I was interviewed by some local radios and newspapers, but it was for work reason. This is something different. I don't think I'm ready for You Tube!!!
Well, sorry for this digression. As usual, thank you for reading and watching and... Have a nice day!
Ciao ragazze,
e ben ritrovate con la nostra ABC Challenge. Avevo un sacco di idee phaighe per questa lettera S, ma alla fine mi sono lanciata in una swirl (spirale) water marble.
Come probabilmente saprete, sono una grande fan di questa tecnica; che è sì complicata, porta via un sacco di tempo, mette a dura prova la vostra pazienza, ma consente di ottenere risultati spettacolari, ogni volta diversi. Dà la possibilità di giocare con un'infinità di colori e pattern e, grazie ad essa, ogni unghia avrà, di volta in volta, un decoro unico.
Per la mia water marble a spirale ho usato Dragon e Lady of the Lake di A England. Il primo è un verde foresta con un tocco dorato, il secondo un viola intenso. Entrambi hanno finish holo scattered.
Inoltre, funzionano perfettamente per questa tecnica, dal momento che si aprono facilmente in acqua.
Amo follemente il risultato finale, e spero fortemente che piaccia anche a voi!
Considerazione finale: ho ricevuto (e ricevo) tante richieste di aiuto e consigli in materia di water marble. Alla fine, dopo tanto tempo, ho deciso di racchiuderli in un video. Di cui ora come ora non so cosa fare! Non so nemmeno se lo pubblicherò.
Nonostante io sia una persona estroversa, allegra e caciarona, l'idea di mettermi in gioco su You Tube mi fa gelare il sangue nelle vene. Sono già apparsa in tv, sono anche stata intervistata da giornali e radio locali, ma era per lavoro. E' molto diverso. Insomma, per ora rimango ferma nel limbo. Vedremo!!!!
Scusate per questa digressione finale, vi ringrazio per la visita e vi auguro una splendida giornata!
and welcome back to our polished marathon! I had a lot of ideas in my mind for letter S. In the end, I decided to create a Swirl Water Marble!
As you probably know, I'm one of the hugest fan of this technique: it's not easy, it's time consuming, you waste a lot of polish but... The final result is stunning. You can play with lots of colors, finishes and designs, and each nail has a unique pattern.
Here I used Dragon and Lady of the Lake, two gorgeous shades by A England. Dragon is a forest green with a hint of gold and a holo scattered finish. Lady of the Lake is a perfect intense purple and has a holo scattered finish too.
They work perfectly for this technique, they easily spread in the water.
I love the final result, and I hope you like it too!
A general, final note: I've recently made a video with tips and tricks for water marbling. Many readers write me to ask my help with this nail art, so I decided to do a sort of video guide. In Italian, of course. Now I don't know what to do with this video! Should I add English subs? Should I even upload it?
I'm a very chatty and friendly person, but I'm soooo embarassed about this. I've already appeared on television, I was interviewed by some local radios and newspapers, but it was for work reason. This is something different. I don't think I'm ready for You Tube!!!
Well, sorry for this digression. As usual, thank you for reading and watching and... Have a nice day!
Ciao ragazze,
e ben ritrovate con la nostra ABC Challenge. Avevo un sacco di idee phaighe per questa lettera S, ma alla fine mi sono lanciata in una swirl (spirale) water marble.
Come probabilmente saprete, sono una grande fan di questa tecnica; che è sì complicata, porta via un sacco di tempo, mette a dura prova la vostra pazienza, ma consente di ottenere risultati spettacolari, ogni volta diversi. Dà la possibilità di giocare con un'infinità di colori e pattern e, grazie ad essa, ogni unghia avrà, di volta in volta, un decoro unico.
Per la mia water marble a spirale ho usato Dragon e Lady of the Lake di A England. Il primo è un verde foresta con un tocco dorato, il secondo un viola intenso. Entrambi hanno finish holo scattered.
Inoltre, funzionano perfettamente per questa tecnica, dal momento che si aprono facilmente in acqua.
Amo follemente il risultato finale, e spero fortemente che piaccia anche a voi!
Considerazione finale: ho ricevuto (e ricevo) tante richieste di aiuto e consigli in materia di water marble. Alla fine, dopo tanto tempo, ho deciso di racchiuderli in un video. Di cui ora come ora non so cosa fare! Non so nemmeno se lo pubblicherò.
Nonostante io sia una persona estroversa, allegra e caciarona, l'idea di mettermi in gioco su You Tube mi fa gelare il sangue nelle vene. Sono già apparsa in tv, sono anche stata intervistata da giornali e radio locali, ma era per lavoro. E' molto diverso. Insomma, per ora rimango ferma nel limbo. Vedremo!!!!
Scusate per questa digressione finale, vi ringrazio per la visita e vi auguro una splendida giornata!
Etichette:
A England,
ABC Challenge 2013,
Green,
Holographic,
Nail art,
Purple,
Water Marble
giovedì 7 marzo 2013
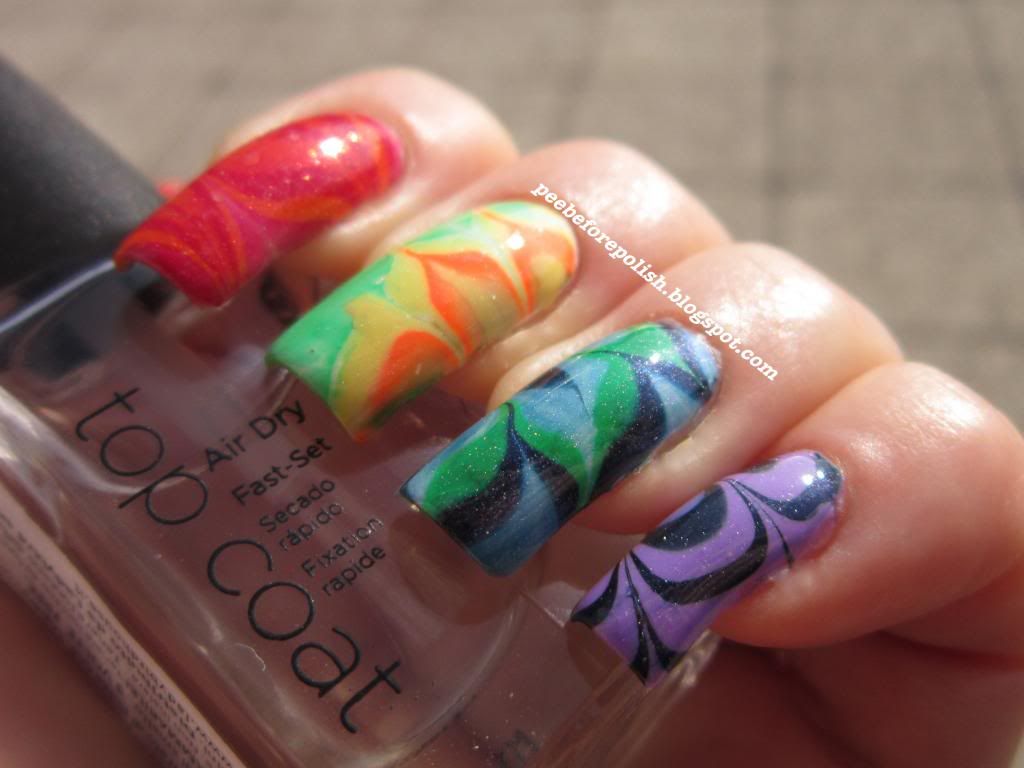
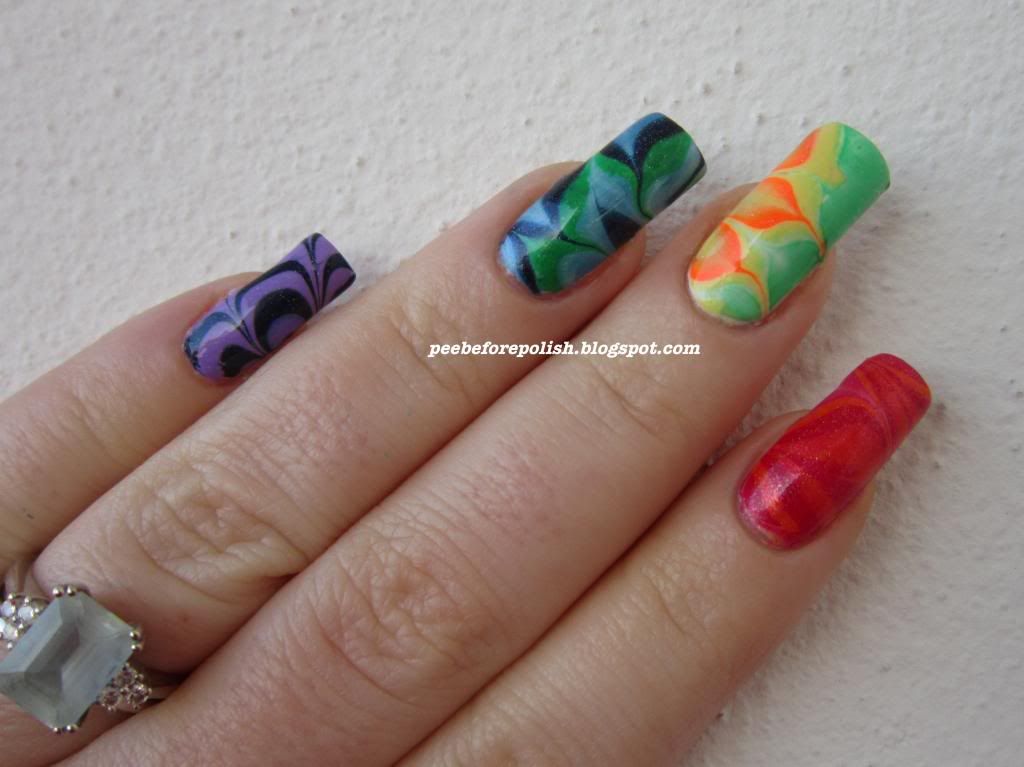
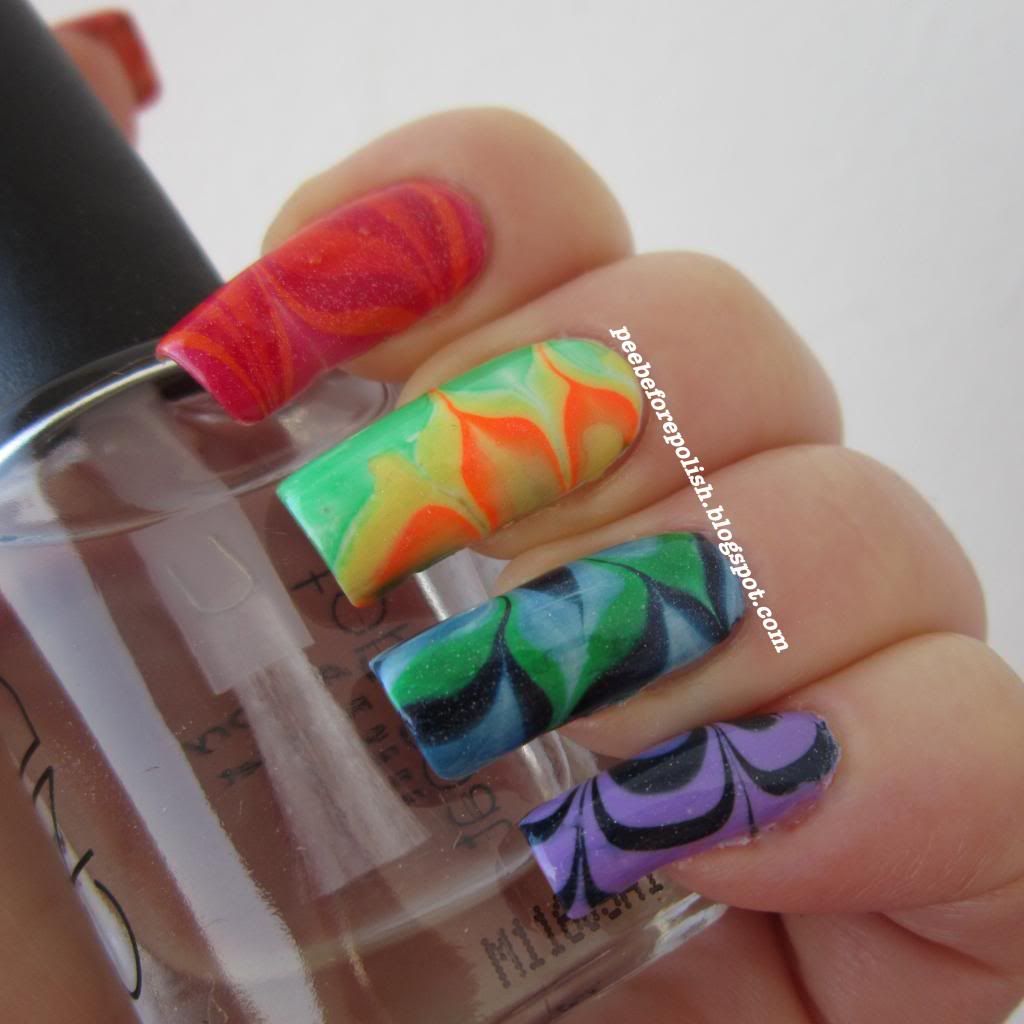
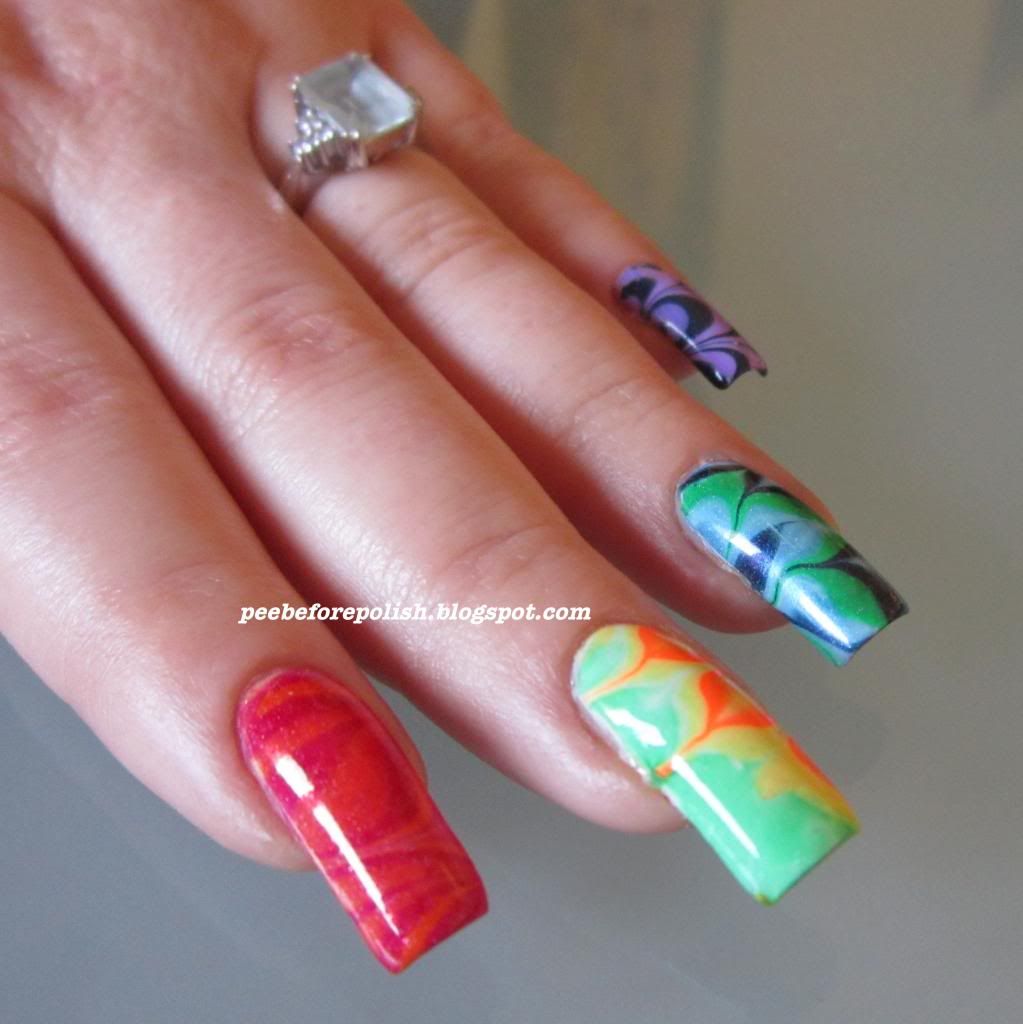
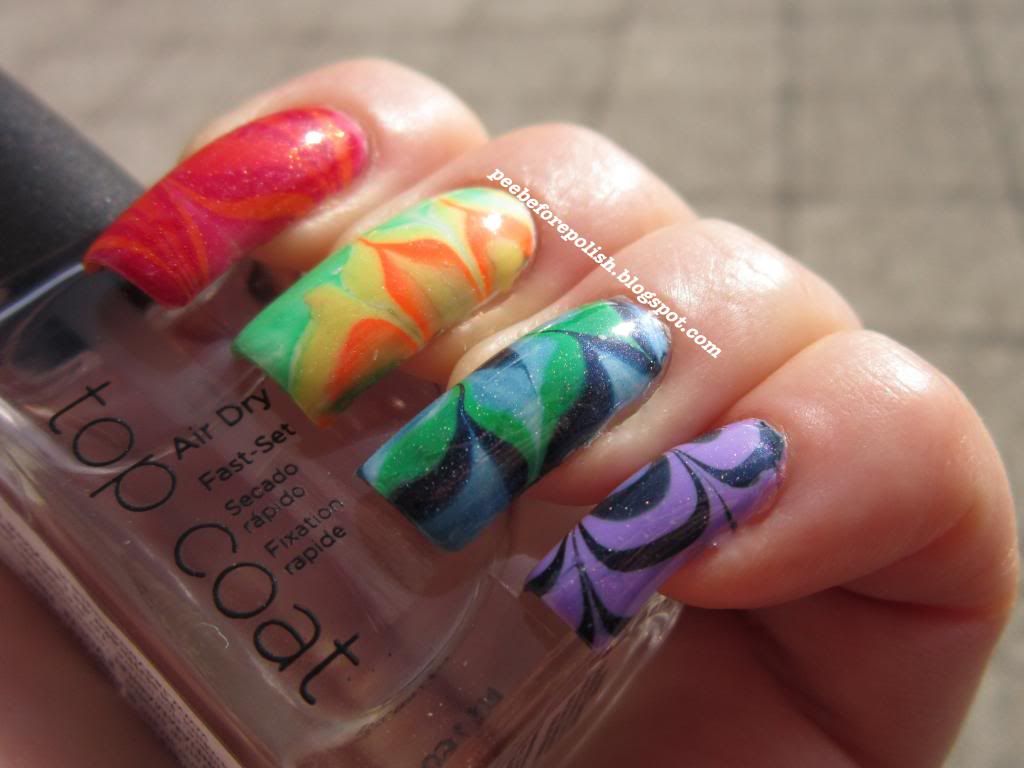
The Rainbow Ladies #8: RAINBOW! [Water Marble]
Keep calm and paint your nails.
E se fosse proprio il processo di pittaggio unghie a farci strippare? Per questo post finale è andata esattamente così.
In un impeto di "modestia portami via", vi confesso che a me le water marbles sono sempre uscite con facilità e naturalezza. Sì, magari dovevo provare tre-quattro smalti prima di trovare quello adatto, ma niente di drammatico.
Con questa water marble ho invece pagato pegno, una sorta di contrappasso (godete molto, eh?).
Diciamo che il problema è stato trovare degli smalti arancio e gialli che non solo si aprissero in acqua, ma che andassero anche d'accordo tra loro e che rimanessero ben distinti, non mescolandosi.
C'è voluta una vita e, non so, quei settordicimila tentativi e quei diciassei rosari di improperi.
Per fortuna, il risultato finale mi ha soddisfatta a tal punto da ripagare ogni mia pena.
Quindi ecco a voi la mia water marble arcobalenosa!
Per realizzarla ho usato:
- Base: Orly Dayglow (bianco);
- Indice: Orly Ignite (rosso) + Basic Beauty #49 (arancio);
- Medio: Orly Melt Your Popsicle (arancio) + H&M Going Bananas (giallo) + Kiko #296 (verde);
- Anulare: Kiko #296 (verde) + Kiko #267 (azzurro) + OPI Russian Navy (indaco);
- Mignolo: OPI Russian Navy (indaco) + Illamasqua Jo'mina (viola).
Per finire, ho passato una mano leggera di China Glaze Wireless Holographic Top Coat, tanto per dare quel lieve "sbrilluccichio" visibile solo al sole.
In linea generale, posso dirvi che Orly Ignite, i due Kiko, l'OPI Russian Navy e l'Illamasqua Jo'mina funzionano divinamente. Gli altri, pur funzionando, mi hanno dato qualche difficoltà. In ogni caso, ribadisco che a volte non è lo smalto X in sé a non funzionare, ma la sua combo con un altro smalto Y a rendervi impossibile il lavoro.
Al di là di queste note tecniche, spero che la mia nail art vi sia piaciuta (in caso contrario potrei uccidervi), vi ringrazio per averci seguito anche in quest'avventura e vi dò appuntamento a presto (dico solo che sabato sarò al Cosmoprof!).
Keep calm and paint your nails.
And it really works for me. Painting my nails is therapeutic, it relaxes me a lot. But it can also happen that the creation of a nail art is the principal cause of stress.
And that's what happen with this water marble, which is also my final post for Rainbow Thursdays.
I must admit that creating a water marble has always been easy for me. Of course, sometimes I had to try three or four nail polishes before finding the one which works, but nothing tragic.
Unfortunately, I had many difficulties with this water marble.
Let's say that I almost became mad before finding a yellow and an orange polish which worked and which got on well together.
Anyway, the final result is sooo nice (IMO, of course) and I'm really happy with it!
So, here is the list of the products I used:
- Base: Orly Dayglow (white);
- Index: Orly Ignite (red) + Basic Beauty #49 (orange);
- Middle: Orly Melt Your Popsicle (orange) + H&M Going Bananas (yellow) + Kiko #296 (green);
- Ring: Kiko #296 (green) + Kiko #267 (blue) + OPI Russian Navy (indigo);
- Pimkie: OPI Russian Navy (indigo) + Illamasqua Jo'mina (purple). As a final touch, I applied one light coat of China Glaze Wireless Holographic Top Coat, just to give to my water marble that bright touch (which is visible only in direct sunlight).
As a general note, I can say that Orly Ignite, the two Kikos, OPI Russian Navy and Illamasqua Jo'mina works perfectly for this technique. I had some issues with the other nail polishes.
Anyway, I'd like to say again that sometimes the polish itself works, but it doesn't work anymore if used in combo with another polish. I think it's a matter of different formulations.
Well, this was the last post of our Rainbow Thursdays, hope you enjoyed our creations. See you soon with other projects and with the chronicles of my adventures at Cosmoprof Worldwide Bologna (I will be there on Saturday, yay!). Have a nice day ladies!
*** Orly Dayglow, Melt Your Popsicle e Ignite e Illamasqua Jo'mina mi sono stati inviati per essere recensiti. Tutti gli altri prodotti sono stati acquistati da me ***
*** Orly Dayglow, Melt Your Popsicle and Ignite and Illamasqua Jo'mina were sent me for review. All the other products were bought by me ***
E se fosse proprio il processo di pittaggio unghie a farci strippare? Per questo post finale è andata esattamente così.
In un impeto di "modestia portami via", vi confesso che a me le water marbles sono sempre uscite con facilità e naturalezza. Sì, magari dovevo provare tre-quattro smalti prima di trovare quello adatto, ma niente di drammatico.
Con questa water marble ho invece pagato pegno, una sorta di contrappasso (godete molto, eh?).
Diciamo che il problema è stato trovare degli smalti arancio e gialli che non solo si aprissero in acqua, ma che andassero anche d'accordo tra loro e che rimanessero ben distinti, non mescolandosi.
C'è voluta una vita e, non so, quei settordicimila tentativi e quei diciassei rosari di improperi.
Per fortuna, il risultato finale mi ha soddisfatta a tal punto da ripagare ogni mia pena.
Quindi ecco a voi la mia water marble arcobalenosa!
Per realizzarla ho usato:
- Base: Orly Dayglow (bianco);
- Indice: Orly Ignite (rosso) + Basic Beauty #49 (arancio);
- Medio: Orly Melt Your Popsicle (arancio) + H&M Going Bananas (giallo) + Kiko #296 (verde);
- Anulare: Kiko #296 (verde) + Kiko #267 (azzurro) + OPI Russian Navy (indaco);
- Mignolo: OPI Russian Navy (indaco) + Illamasqua Jo'mina (viola).
Per finire, ho passato una mano leggera di China Glaze Wireless Holographic Top Coat, tanto per dare quel lieve "sbrilluccichio" visibile solo al sole.
In linea generale, posso dirvi che Orly Ignite, i due Kiko, l'OPI Russian Navy e l'Illamasqua Jo'mina funzionano divinamente. Gli altri, pur funzionando, mi hanno dato qualche difficoltà. In ogni caso, ribadisco che a volte non è lo smalto X in sé a non funzionare, ma la sua combo con un altro smalto Y a rendervi impossibile il lavoro.
Al di là di queste note tecniche, spero che la mia nail art vi sia piaciuta (in caso contrario potrei uccidervi), vi ringrazio per averci seguito anche in quest'avventura e vi dò appuntamento a presto (dico solo che sabato sarò al Cosmoprof!).
Keep calm and paint your nails.
And it really works for me. Painting my nails is therapeutic, it relaxes me a lot. But it can also happen that the creation of a nail art is the principal cause of stress.
And that's what happen with this water marble, which is also my final post for Rainbow Thursdays.
I must admit that creating a water marble has always been easy for me. Of course, sometimes I had to try three or four nail polishes before finding the one which works, but nothing tragic.
Unfortunately, I had many difficulties with this water marble.
Let's say that I almost became mad before finding a yellow and an orange polish which worked and which got on well together.
Anyway, the final result is sooo nice (IMO, of course) and I'm really happy with it!
So, here is the list of the products I used:
- Base: Orly Dayglow (white);
- Index: Orly Ignite (red) + Basic Beauty #49 (orange);
- Middle: Orly Melt Your Popsicle (orange) + H&M Going Bananas (yellow) + Kiko #296 (green);
- Ring: Kiko #296 (green) + Kiko #267 (blue) + OPI Russian Navy (indigo);
- Pimkie: OPI Russian Navy (indigo) + Illamasqua Jo'mina (purple). As a final touch, I applied one light coat of China Glaze Wireless Holographic Top Coat, just to give to my water marble that bright touch (which is visible only in direct sunlight).
As a general note, I can say that Orly Ignite, the two Kikos, OPI Russian Navy and Illamasqua Jo'mina works perfectly for this technique. I had some issues with the other nail polishes.
Anyway, I'd like to say again that sometimes the polish itself works, but it doesn't work anymore if used in combo with another polish. I think it's a matter of different formulations.
Well, this was the last post of our Rainbow Thursdays, hope you enjoyed our creations. See you soon with other projects and with the chronicles of my adventures at Cosmoprof Worldwide Bologna (I will be there on Saturday, yay!). Have a nice day ladies!
*** Orly Dayglow, Melt Your Popsicle e Ignite e Illamasqua Jo'mina mi sono stati inviati per essere recensiti. Tutti gli altri prodotti sono stati acquistati da me ***
*** Orly Dayglow, Melt Your Popsicle and Ignite and Illamasqua Jo'mina were sent me for review. All the other products were bought by me ***
Etichette:
Blue,
Green,
Light blue,
Nail art,
Orange,
Purple,
Rainbow Thursdays,
Red,
Water Marble,
Yellow
lunedì 31 dicembre 2012
New Year's Eve Manicure: red and gold green water marble
Salve a tutte!
Post veloce per mostrarvi l'ultima manicure dell'anno... E non potevo che chiudere in bellezza con una water marble, che non facevo proprio dal Capodanno 2011!
Per realizzarla ho usato come base l'H&M Gold, per dare un tocco di dorato caldo, l'Orly Torrid, il rosso festivo per eccellenza, e l'OPI On Her Majesty's Secret Service, uno smalto così fantastico e multisfaccettato che è davvero difficile descriverlo: un trionfo di verde-blu-viola-argento a seconda della luce. O magari preferite la definizione della mia amica Eleonora che lo ha descritto come "orgasmo policromico".
Il motivo scelto varia a seconda delle unghie, ho alternato la ragnatela, alla zebra, alla stella di Natale.
Vi lascio alle foto e, ovviamente, auguro a tutte voi una serata di festeggiamenti scoppiettante, seguita da un 2013 che non deluda le vostre aspettative.
Per me il 2012 è stato un annus horribilis, le prospettive per l'anno nuovo non sono esattamente esaltanti, anzi, ma spero di avere sempre la forza e il coraggio di piegarmi ma non spezzarmi alle avversità.
Io continuo a crederci!
Un abbraccio, grazie per il sostegno e il supporto nella mia attività di blogging, grazie per ogni commento, grazie per ogni singola visualizzazione, grazie grazie grazie!
Hi ladies!
A quick post just to show you my New Year's Eve Manicure... I did a water marble because I was missing this kind of nail art, I realized my last water marble one year ago!
Here I used H&M Gold as a base because I wanted to add a warm gold touch to the background of the water marble; for the main design I used Orly Torrid, the best festive red of the last years, and OPI On Her Majesty's Secret Service. This polish is very hard to describe... It's a stunning, amazing, prismatic product. Depending on the light, it can be blue, green, purple or silver... Pure love at the first coat!
I used three different patterns depending on the nail: I did zebra, Christmas Poinsetta and spider web designs.
Well, this is my last post of the year and I wish you a super funny New Year's Eve party. I really hope that the new year will be great for all of you and that your expectations won't be disappointed.
To me, 2012 was a horrible year, I don't think that 2013 will be better but I won't stop hoping for better times. I also hope that I'll have the strenght to face all the new challenges of my life.
A big hug to all of you, I want to thank you for your support during this year of blogging, thank you for every comment, thank you for every single visit, thank you thank you and thank you!
Post veloce per mostrarvi l'ultima manicure dell'anno... E non potevo che chiudere in bellezza con una water marble, che non facevo proprio dal Capodanno 2011!
Per realizzarla ho usato come base l'H&M Gold, per dare un tocco di dorato caldo, l'Orly Torrid, il rosso festivo per eccellenza, e l'OPI On Her Majesty's Secret Service, uno smalto così fantastico e multisfaccettato che è davvero difficile descriverlo: un trionfo di verde-blu-viola-argento a seconda della luce. O magari preferite la definizione della mia amica Eleonora che lo ha descritto come "orgasmo policromico".
Il motivo scelto varia a seconda delle unghie, ho alternato la ragnatela, alla zebra, alla stella di Natale.
Vi lascio alle foto e, ovviamente, auguro a tutte voi una serata di festeggiamenti scoppiettante, seguita da un 2013 che non deluda le vostre aspettative.
Per me il 2012 è stato un annus horribilis, le prospettive per l'anno nuovo non sono esattamente esaltanti, anzi, ma spero di avere sempre la forza e il coraggio di piegarmi ma non spezzarmi alle avversità.
Io continuo a crederci!
Un abbraccio, grazie per il sostegno e il supporto nella mia attività di blogging, grazie per ogni commento, grazie per ogni singola visualizzazione, grazie grazie grazie!
Hi ladies!
A quick post just to show you my New Year's Eve Manicure... I did a water marble because I was missing this kind of nail art, I realized my last water marble one year ago!
Here I used H&M Gold as a base because I wanted to add a warm gold touch to the background of the water marble; for the main design I used Orly Torrid, the best festive red of the last years, and OPI On Her Majesty's Secret Service. This polish is very hard to describe... It's a stunning, amazing, prismatic product. Depending on the light, it can be blue, green, purple or silver... Pure love at the first coat!
I used three different patterns depending on the nail: I did zebra, Christmas Poinsetta and spider web designs.
Well, this is my last post of the year and I wish you a super funny New Year's Eve party. I really hope that the new year will be great for all of you and that your expectations won't be disappointed.
To me, 2012 was a horrible year, I don't think that 2013 will be better but I won't stop hoping for better times. I also hope that I'll have the strenght to face all the new challenges of my life.
A big hug to all of you, I want to thank you for your support during this year of blogging, thank you for every comment, thank you for every single visit, thank you thank you and thank you!
sabato 31 dicembre 2011
Water Marble: green and gold with Essence and H&M
Ultimo post dell'anno!
Spero che lo legga qualcuno e che non siate tutte impegnate a prepararvi per il cenone! Dài, prometto che vi rubo poco tempo: questa è la mia seconda water marble, stavolta l'esperienza è stata meno traumatica. Se volete qualche dritta per non incorrere nei miei stessi errori, vi rimando al mio post introduttivo su questa tecnica.
Per realizzare questa water marble ho utilizzato l'Essence In the Jungle (la prima versione, meglio conosciuta come il dupe dell'OPI Jade is the New Black) e l'H&M Gold.
Devo ammettere che la scelta del Gold non è stata felicissima, è troppo poco pigmentato per risaltare a dovere e ho dovuto fare dei ritocchi a mano. Peccato, perché si allarga perfettamente nell'acqua, la formula è davvero adatta!
Invece In the Jungle è favoloso sotto tutti i punti di vista: bellissimo da solo, perfetto per lo stamping, adattissimo alla water marble. Un vero e proprio gioiellino!
Spero che vi piaccia e, naturalmente, i miei migliori auguri!
Considerando che il mio 2011 è stato davvero orrido, anzi, cacherrimo, della serie "quasi quasi mò mi stordisco con l'acetone", auspico nell'arrivo di tempi migliori e ripongo le mie speranze in questo giro di boa, incrociando le dita affinché non sia solo un giro della pagina del calendario!!!!
Ed intanto, stasera, si magna, si beve e ci si diverte!
This is my second water marble, if you want to read my introduction to this technique you can click here.
I used Essence In the Jungle (the old version, aka the dupe of OPI Jade is the new Black) and H&M Gold. I must admit that Gold wasn't an excellent choice, it is not so pigmented and I had to retouch the final manicure. It's a pity, because its formula is great for water marble.
On the contrary, In the Jungle is the perfect polish: amazing if you wear it on its own, gorgeous for stamping and great for water marbling!
Hope you like it and, of course, my best wishes for the New Year!
My 2011 was really horrible and awful, so I really hope that the New Year will take me better times, opportunities, etc. I really hope that Italy will have a better future, too. It's a pain to see my beloved country destroyed by corruption and... Lots of other problems that I think you already know.
In the meantime, I'm so looking forward for tonight: food, drink and fun! Yeah!
Spero che lo legga qualcuno e che non siate tutte impegnate a prepararvi per il cenone! Dài, prometto che vi rubo poco tempo: questa è la mia seconda water marble, stavolta l'esperienza è stata meno traumatica. Se volete qualche dritta per non incorrere nei miei stessi errori, vi rimando al mio post introduttivo su questa tecnica.
Per realizzare questa water marble ho utilizzato l'Essence In the Jungle (la prima versione, meglio conosciuta come il dupe dell'OPI Jade is the New Black) e l'H&M Gold.
Devo ammettere che la scelta del Gold non è stata felicissima, è troppo poco pigmentato per risaltare a dovere e ho dovuto fare dei ritocchi a mano. Peccato, perché si allarga perfettamente nell'acqua, la formula è davvero adatta!
Invece In the Jungle è favoloso sotto tutti i punti di vista: bellissimo da solo, perfetto per lo stamping, adattissimo alla water marble. Un vero e proprio gioiellino!
Spero che vi piaccia e, naturalmente, i miei migliori auguri!
Considerando che il mio 2011 è stato davvero orrido, anzi, cacherrimo, della serie "quasi quasi mò mi stordisco con l'acetone", auspico nell'arrivo di tempi migliori e ripongo le mie speranze in questo giro di boa, incrociando le dita affinché non sia solo un giro della pagina del calendario!!!!
Ed intanto, stasera, si magna, si beve e ci si diverte!
| In the shade |
| In the shade |
| Indirect sunlight |
| Direct sunlight |
Last post of the year!
Hope you're not too busy and you can find the time to read it. I promise, it will be very short.This is my second water marble, if you want to read my introduction to this technique you can click here.
I used Essence In the Jungle (the old version, aka the dupe of OPI Jade is the new Black) and H&M Gold. I must admit that Gold wasn't an excellent choice, it is not so pigmented and I had to retouch the final manicure. It's a pity, because its formula is great for water marble.
On the contrary, In the Jungle is the perfect polish: amazing if you wear it on its own, gorgeous for stamping and great for water marbling!
Hope you like it and, of course, my best wishes for the New Year!
My 2011 was really horrible and awful, so I really hope that the New Year will take me better times, opportunities, etc. I really hope that Italy will have a better future, too. It's a pain to see my beloved country destroyed by corruption and... Lots of other problems that I think you already know.
In the meantime, I'm so looking forward for tonight: food, drink and fun! Yeah!
giovedì 1 dicembre 2011
My first water marble
Come promesso, ecco a voi la mia prima water marble!
Visto che son stata assai prolissa nel mio precedente post, cercherò di riequilibrare la situazione tagliando corto. I due smalti che ho usato (marca Chic per il bianco e Quandoè per il blu) li ho entrambi acquistati ad un prezzo stracciato da Acqua & Sapone.
Ho usato il bianco sia per il pattern che come base.
Il blu, devo dirlo, è semplicemente perfetto per questa tecnica e ve lo consiglio caldamente, un po' meno lo è il bianco, le gocce hanno serie difficoltà ad "aprirsi" nell'acqua. Sono piacevolmente stupita dalla durata di questi smalti, nonostante gli innumerevoli strati (base + due mani di bianco + top coat + disegno + top coat!) hanno tenuto egregiamente per 6 giorni!
Essendo il mio primo tentativo in assoluto ho preferito fare ogni unghia diversa dall'altra, tanto per sperimentare un po' e capire quale genere di disegno fosse il più carino (il mio preferito è l'anulare!)..
Ho anche applicato qualche strass, in parte per mero scopo decorativo ma anche per coprire qualche bollicina particolarmente antiestetica (le bolle saranno la vostra persecuzione durante ogni singola water marble).
Che dire, spero che vi sia piaciuta!
As promised, here it is: my first water marble!
I used two super cheap nail polishes (the white is by Chic and the blue by Quandoè) and I used the white one for the base and for the designs too.
The blue polish is simply perfect for this technique. I have a bit of difficulties with the white, because the drops didn't open correctly in the water. I'm really satisfied with their longevity, despite the number of coats (base + 2 coats of white base + top coat + design + top coat) they lasted 6 days on my nails.
Since this was my first attempt, I made different designs for every nail (my fav one is the ring finger). I also applied some strass: I think they are nice and they also help hiding the bubbles caused by the water.
That's all I have for you today, hope you enjoyed this mani and thank you for reading!
Visto che son stata assai prolissa nel mio precedente post, cercherò di riequilibrare la situazione tagliando corto. I due smalti che ho usato (marca Chic per il bianco e Quandoè per il blu) li ho entrambi acquistati ad un prezzo stracciato da Acqua & Sapone.
Ho usato il bianco sia per il pattern che come base.
Il blu, devo dirlo, è semplicemente perfetto per questa tecnica e ve lo consiglio caldamente, un po' meno lo è il bianco, le gocce hanno serie difficoltà ad "aprirsi" nell'acqua. Sono piacevolmente stupita dalla durata di questi smalti, nonostante gli innumerevoli strati (base + due mani di bianco + top coat + disegno + top coat!) hanno tenuto egregiamente per 6 giorni!
Essendo il mio primo tentativo in assoluto ho preferito fare ogni unghia diversa dall'altra, tanto per sperimentare un po' e capire quale genere di disegno fosse il più carino (il mio preferito è l'anulare!)..
Ho anche applicato qualche strass, in parte per mero scopo decorativo ma anche per coprire qualche bollicina particolarmente antiestetica (le bolle saranno la vostra persecuzione durante ogni singola water marble).
Che dire, spero che vi sia piaciuta!
| Direct sunlight |
| In the shade |
| In the shade |
| In the shade |
As promised, here it is: my first water marble!
I used two super cheap nail polishes (the white is by Chic and the blue by Quandoè) and I used the white one for the base and for the designs too.
The blue polish is simply perfect for this technique. I have a bit of difficulties with the white, because the drops didn't open correctly in the water. I'm really satisfied with their longevity, despite the number of coats (base + 2 coats of white base + top coat + design + top coat) they lasted 6 days on my nails.
Since this was my first attempt, I made different designs for every nail (my fav one is the ring finger). I also applied some strass: I think they are nice and they also help hiding the bubbles caused by the water.
That's all I have for you today, hope you enjoyed this mani and thank you for reading!
Etichette:
Blue,
Nail art,
Water Marble,
White
martedì 29 novembre 2011
Water Marble: an introduction and some advices
*** ENGLISH VERSION AFTER THE JUMP! PLEASE CLICK ON READ MORE IF YOU'RE INTERESTED IN READING! ***
Siamo tutte (o quasi) d'accordo: la water marble è una gran figata, a livello di risultato ottenuto.
Il problema è costituito da tutto il procedimento che c'è dietro quel risultato...
Per mesi ho sbavato senza ritegno sulle foto di talentuose bloggers come Tartofraises o Colette, pensando tra me e me: "Ci devo provare, ci devo provare...".
Lo scorso week end mi sentivo in vena di sperimentare qualche nuova (per me) tecnica e, per la serie "famose del male", ho optato proprio per la water marble, complici anche i pareri delle mie comari smalto-dipendenti (VOI sapete chi siete!).
Prima di procedere ho scaricato una marea di tutorials da You Tube, ho letto innumerevoli posts e ho pensato di raccogliere qui un po' di consigli se mai doveste decidere di buttarvi, in pieno stile kamikaze, in questa piccola avventura.
CONSIGLI GENERICI:
- pochi smalti funzionano con la water marble. Dovete sperimentare! Evitate come la peste gli smalti glitter, i flakies ed i mattes;
- usate acqua a temperatura ambiente;
- applicate sulle unghie una base bianca o nude per far risaltare maggiormente il decoro;
- proteggete le cuticole con dello scotch, o sarà un incubo ripulire tutto!
- preparate tutto il materiale necessario PRIMA di iniziare, in modo da poter procedere più rapidamente e con comodità.
CONSIGLI DERIVANTI DALLA MIA ESPERIENZA
- non per fare la tirchiona, ma cercate di usare smalti economici o di facile reperibilità. Per fare la water marble occorre davvero una quantità esagerata di prodotto, quindi sconsiglierei di usare il vostro smalto preferito, che magari nel frattempo è diventato discontinued, o di dare fondo alla vostra collezione di Chanel o Rescue Beauty Lounge. Nella foto potete vedere il livello di consumo di uno degli smalti da me usati, che prima della water marble era illibato. (considerate anche che ho fatto qualche errorino e ho dovuto buttare il pattern ottenuto);
- lasciate asciugare la base bianca o nude con accuratezza, meglio ancora se la stendete la sera prima di procedere con la water marble, così avrete un pensiero in meno (ovvero il terrore di urtare qualcosa con lo smalto ancora semi-fresco);
- se non avete molta fantasia, fate come me e traete ispirazione dai numerosi video presenti in rete;
- "incerottatevi" le cuticole di tutte le unghie PRIMA di iniziare, così eviterete spiacevoli incidenti tra scotch ed unghia appena "watermarblizzata".
- cercate di eliminare le goccine d'acqua rimaste sull'unghia subito dopo averla tirata fuori dall'acqua stessa, con l'ausilio di un angolino di un fazzoletto di carta e molta delicatezza, altrimenti andranno a formare delle antiestetiche bollicine difficili da mascherare;
- take your time! La pazienza è fondamentale, anche perché difficilmente tutto andrà per il verso giusto sin dal primo tentativo (come? Alla vostra prima esperienza è andato tutto liscio come l'olio? Evitate di scriverlo nei commenti, potrei uccidervi!!!!!!!). Se doveste avere anche il fattore tempo che gioca a vostro sfavore, rischiate solo di incasinarvi ulteriormente.
Dopo tutta questa pappardella, vi lascio una piccola preview del risultato ottenuto. Il resto nel prossimo post (suspeeeeeeeeeeense!).
In ogni caso, credo che l'intera esperienza possa essere riassunta in questa favolosa vignetta della mitica Deniz di Emerald Sparkled, una delle mie blogger preferite, che ringrazio molto anche per avermi dato il permesso di utilizzarla:
Spero di esservi stata utile, e buona serata a tutte!
Siamo tutte (o quasi) d'accordo: la water marble è una gran figata, a livello di risultato ottenuto.
Il problema è costituito da tutto il procedimento che c'è dietro quel risultato...
Per mesi ho sbavato senza ritegno sulle foto di talentuose bloggers come Tartofraises o Colette, pensando tra me e me: "Ci devo provare, ci devo provare...".
Lo scorso week end mi sentivo in vena di sperimentare qualche nuova (per me) tecnica e, per la serie "famose del male", ho optato proprio per la water marble, complici anche i pareri delle mie comari smalto-dipendenti (VOI sapete chi siete!).
Prima di procedere ho scaricato una marea di tutorials da You Tube, ho letto innumerevoli posts e ho pensato di raccogliere qui un po' di consigli se mai doveste decidere di buttarvi, in pieno stile kamikaze, in questa piccola avventura.
CONSIGLI GENERICI:
- pochi smalti funzionano con la water marble. Dovete sperimentare! Evitate come la peste gli smalti glitter, i flakies ed i mattes;
- usate acqua a temperatura ambiente;
- applicate sulle unghie una base bianca o nude per far risaltare maggiormente il decoro;
- proteggete le cuticole con dello scotch, o sarà un incubo ripulire tutto!
- preparate tutto il materiale necessario PRIMA di iniziare, in modo da poter procedere più rapidamente e con comodità.
CONSIGLI DERIVANTI DALLA MIA ESPERIENZA
- non per fare la tirchiona, ma cercate di usare smalti economici o di facile reperibilità. Per fare la water marble occorre davvero una quantità esagerata di prodotto, quindi sconsiglierei di usare il vostro smalto preferito, che magari nel frattempo è diventato discontinued, o di dare fondo alla vostra collezione di Chanel o Rescue Beauty Lounge. Nella foto potete vedere il livello di consumo di uno degli smalti da me usati, che prima della water marble era illibato. (considerate anche che ho fatto qualche errorino e ho dovuto buttare il pattern ottenuto);
- lasciate asciugare la base bianca o nude con accuratezza, meglio ancora se la stendete la sera prima di procedere con la water marble, così avrete un pensiero in meno (ovvero il terrore di urtare qualcosa con lo smalto ancora semi-fresco);
- se non avete molta fantasia, fate come me e traete ispirazione dai numerosi video presenti in rete;
- "incerottatevi" le cuticole di tutte le unghie PRIMA di iniziare, così eviterete spiacevoli incidenti tra scotch ed unghia appena "watermarblizzata".
- cercate di eliminare le goccine d'acqua rimaste sull'unghia subito dopo averla tirata fuori dall'acqua stessa, con l'ausilio di un angolino di un fazzoletto di carta e molta delicatezza, altrimenti andranno a formare delle antiestetiche bollicine difficili da mascherare;
- take your time! La pazienza è fondamentale, anche perché difficilmente tutto andrà per il verso giusto sin dal primo tentativo (come? Alla vostra prima esperienza è andato tutto liscio come l'olio? Evitate di scriverlo nei commenti, potrei uccidervi!!!!!!!). Se doveste avere anche il fattore tempo che gioca a vostro sfavore, rischiate solo di incasinarvi ulteriormente.
Dopo tutta questa pappardella, vi lascio una piccola preview del risultato ottenuto. Il resto nel prossimo post (suspeeeeeeeeeeense!).
In ogni caso, credo che l'intera esperienza possa essere riassunta in questa favolosa vignetta della mitica Deniz di Emerald Sparkled, una delle mie blogger preferite, che ringrazio molto anche per avermi dato il permesso di utilizzarla:
![]() |
| Credits |
Spero di esservi stata utile, e buona serata a tutte!
Iscriviti a:
Post (Atom)