Ciao a tutte!
Come annunciato, ecco il tutorial per fare delle striped nails. Il procedimento è davvero semplicissimo, basta solo un po' di pazienza.
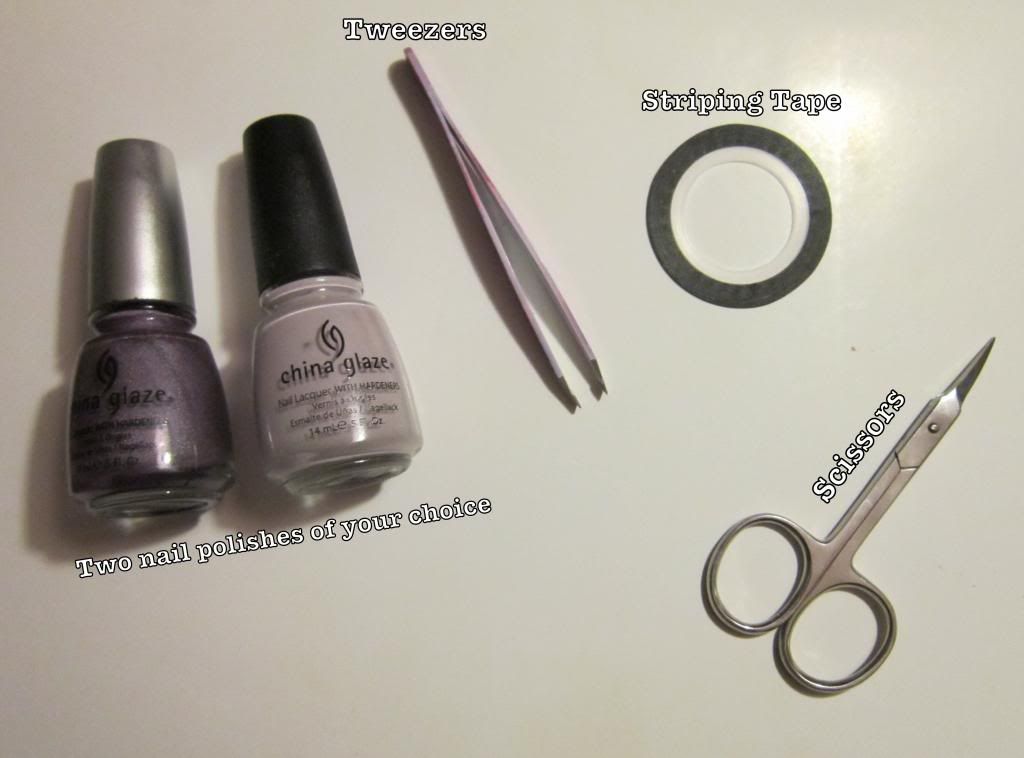
Cosa vi serve:
Hi ladies!
As promised, here it is my tutorial for striped nails. This is really a super simple nail art, you only need a bit of patience!
Products you need:
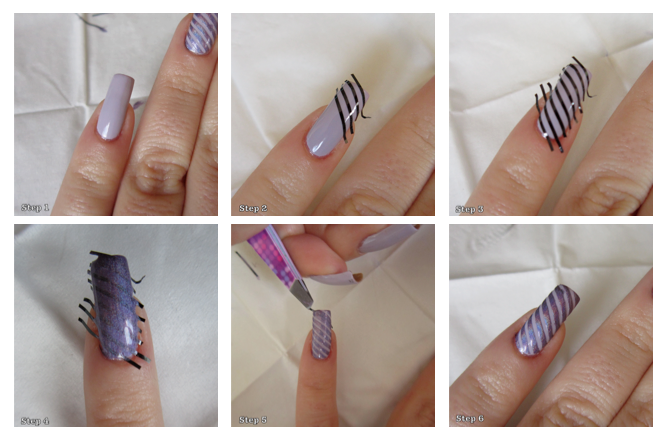
Il procedimento:
1) Stendete base, smalto colorato a piacimento e top coat.
2) Quando tutto è ben asciutto, tagliate dei piccoli pezzi di striping tape, abbastanza lunghi da "sbordare" oltre l'unghia in modo che rimuoverli risulti semplice, ed iniziate a posizionarli. Fateli aderire molto bene all'unghia, in modo che lo smalto non si "insinui" sotto.
3) Completate la sistemazione delle strisce adesive sull'unghia; io ho preferito un intervallo "serrato" e regolare, con andamento diagonale, ma ovviamente voi potete procedere come preferite.
4) Una volta terminato di disporre i pezzetti di nastro, stendete una generosa mano del secondo smalto da contrastro.
5) Rimuovete, preferibilmente con l'ausilio di una pinzetta da sopracciglia, le striscioline. Questo step va fatto a smalto ancora fresco, altrimenti rovinerete le righe per via del progressivo addensamento dello smalto stesso.
6) Opzionale: stendete il top coat in modo da omogeneizzare la superficie dell'unghia. In questo caso io non l'ho fatto per non rovinare l'effetto holo. FINITO!
Come vedete, è davvero superfacile! La difficoltà sta, semmai, nell'avere la pazienza e la precisione di stendere tante strisce se volete ottenere intervalli regolari e stretti come i miei.
Se usate uno smalto olografico, poi, dovrete anche essere molto veloci a togliere tutto prima che lo stesso si asciughi - e sappiamo che gli holo si asciugano alla velocità della luce!
Arrivata all'anulare ho capito che era meglio togliere due strisce alla volta... Consiglio anche a voi di fare così!
Spero che questo tutorial vi sia utile e a presto!
Here it is the method I used:
1) Apply your base coat, two coats of nail polish (I chose China Glaze Light as Air) and top coat.
2) When it's completely dry, cut several stripes of striping tape. They have to be long enought to allow easy removal. Place the stripes and make sure there is no space between your nails and striping tapes.
3) Complete the placement of the stripes. Here I did a diagonal design with a few space between the stripes, but you can do what you prefer.
4) When you finished placing the stripes, apply a generous coat of the second polish (here, China Glaze IDK) on the nail.
5) Remove the stripes, using a tweezers if this can help. You have to remove the stripes while the second polish is still wet, or you will ruin the final design.
6) Apply a top coat, it will help to obtain a smooth nail surface. I didn't apply a top coat here because I didn't want to ruin the holo effect. DONE!
It is really super easy, you only need a bit of patience expecially if you do a design with a very small gap between stripes.
If you're using a holo polish, you have to be fast to remove the stripes - as we know, holo polishes dry incredibly quickly. You can even remove two stripes at a time.
Hope this tutorial can be useful, thank you for reading and watching and have a nice evening!