Ads 468x60px

giovedì 29 novembre 2012

ABC Challenge: R for Chanel Rouge Noir

Buonasera a tutte e bentornate ad una nuova puntata della ABC Challenge!
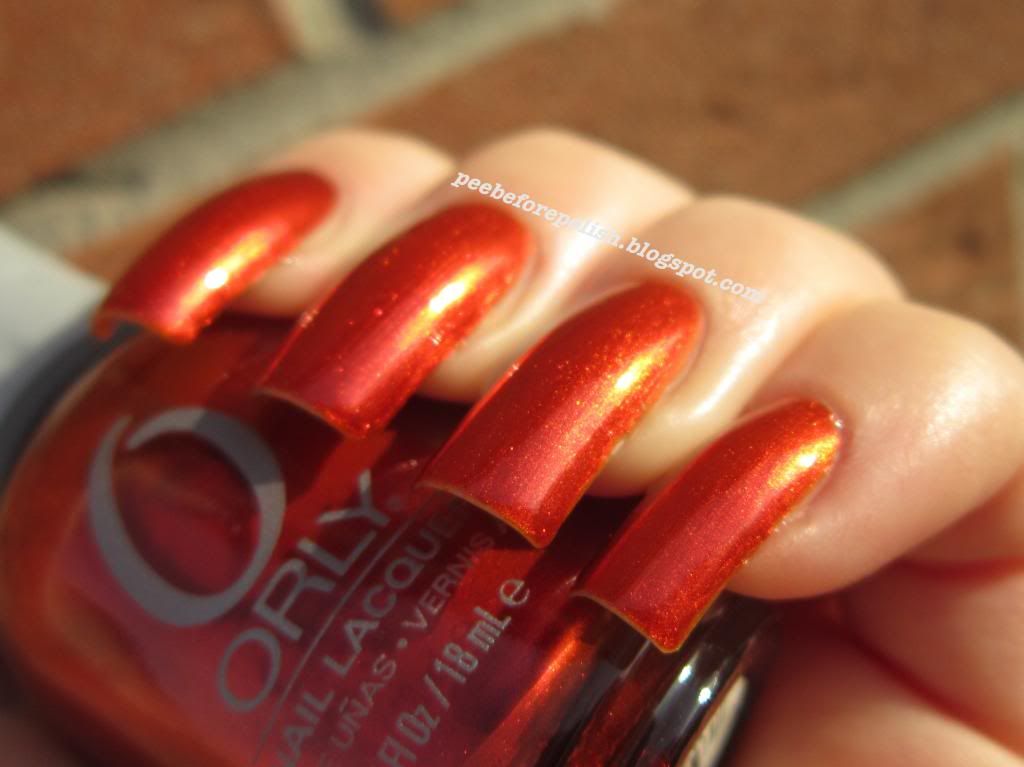
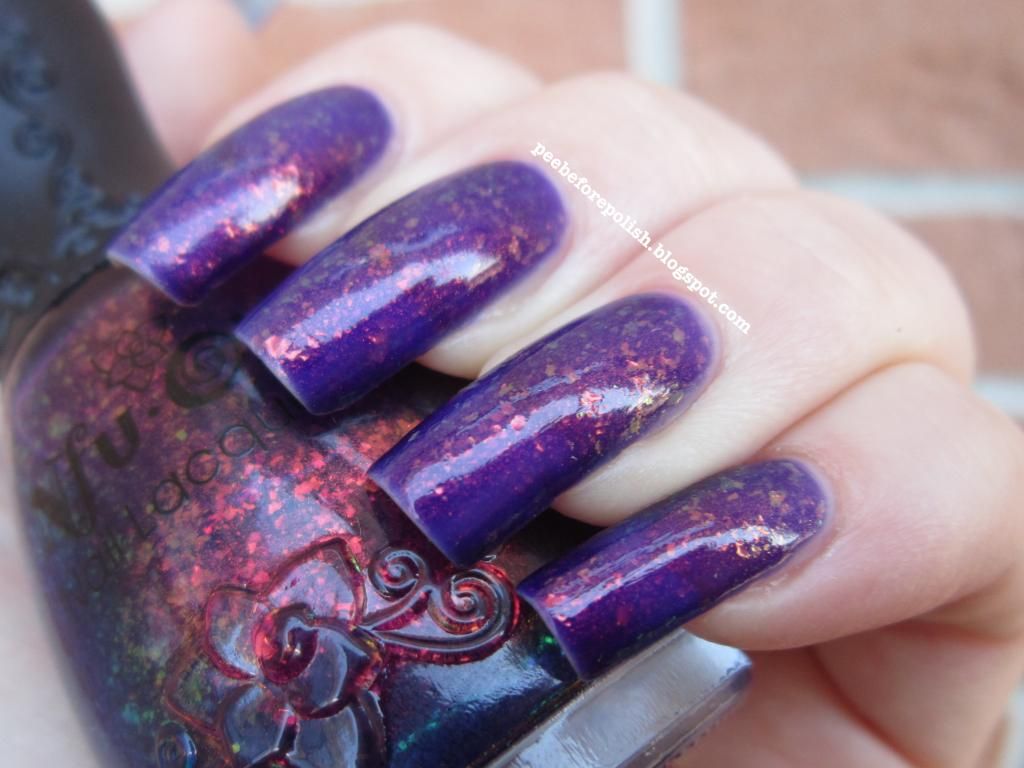
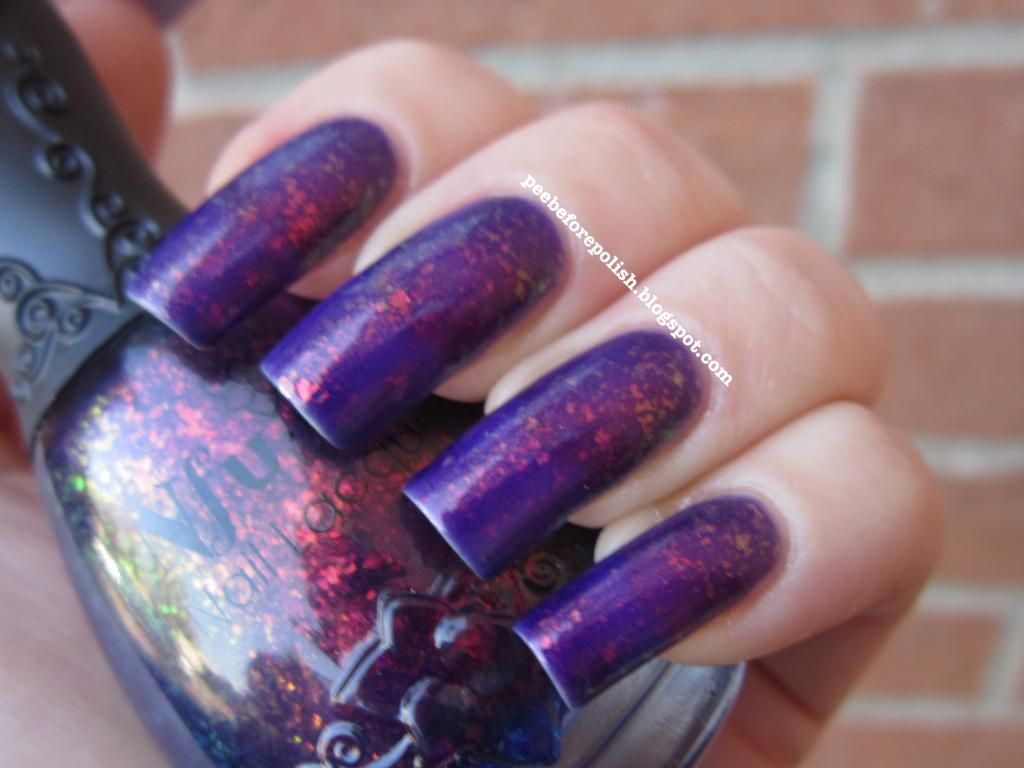
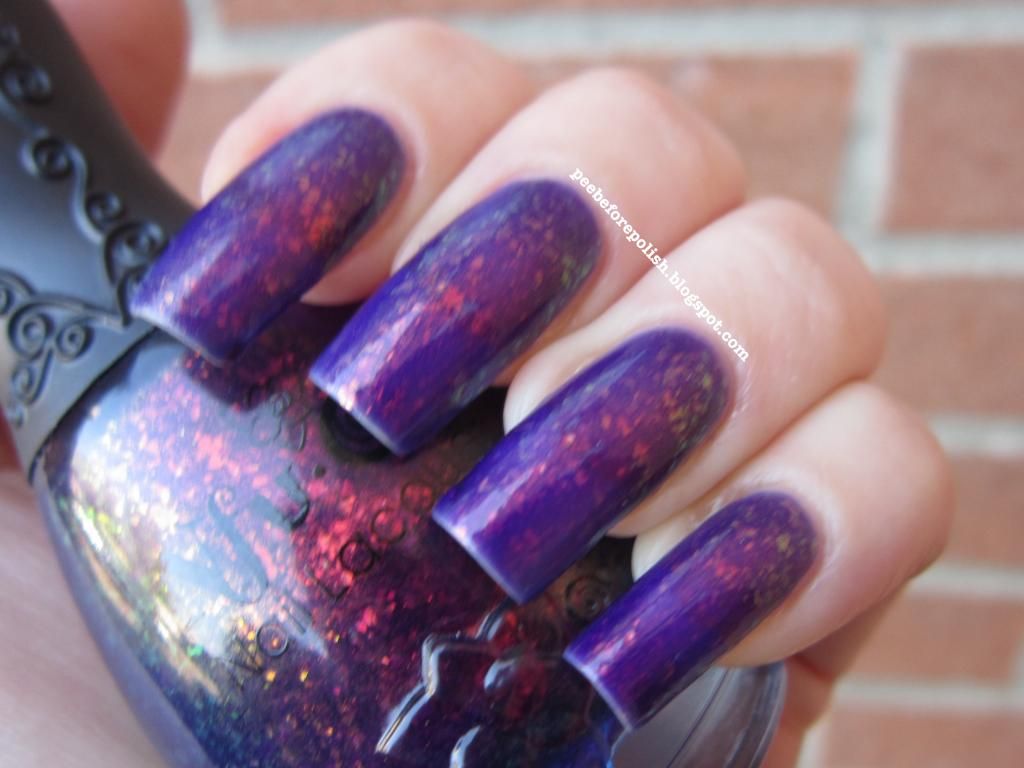
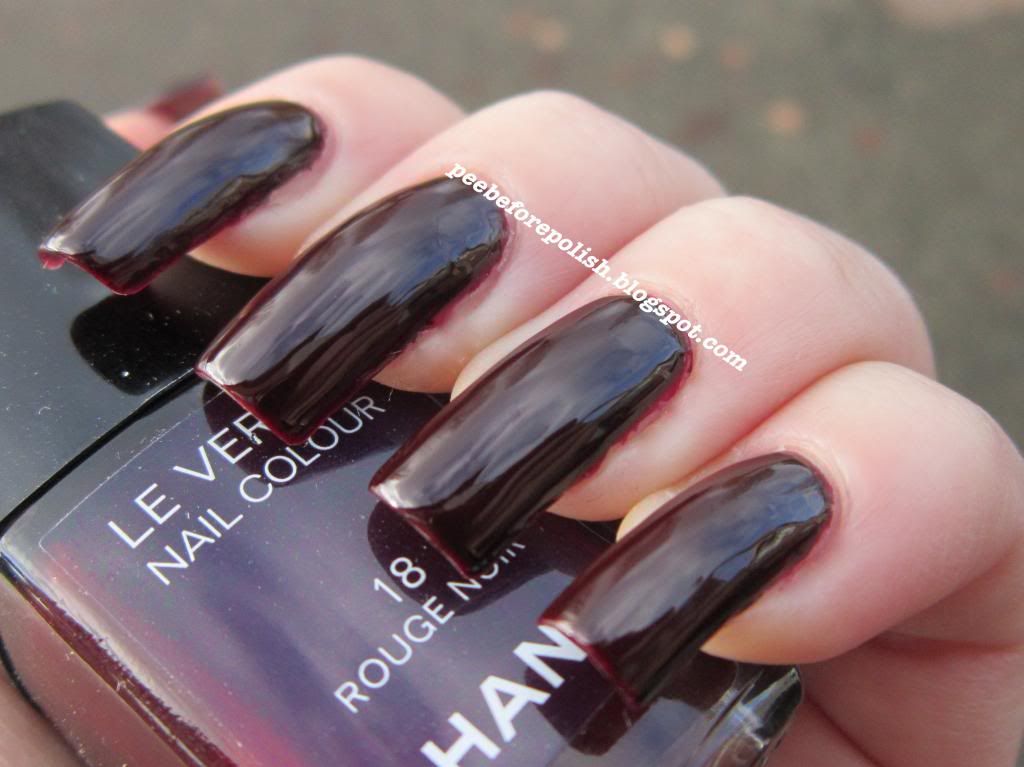
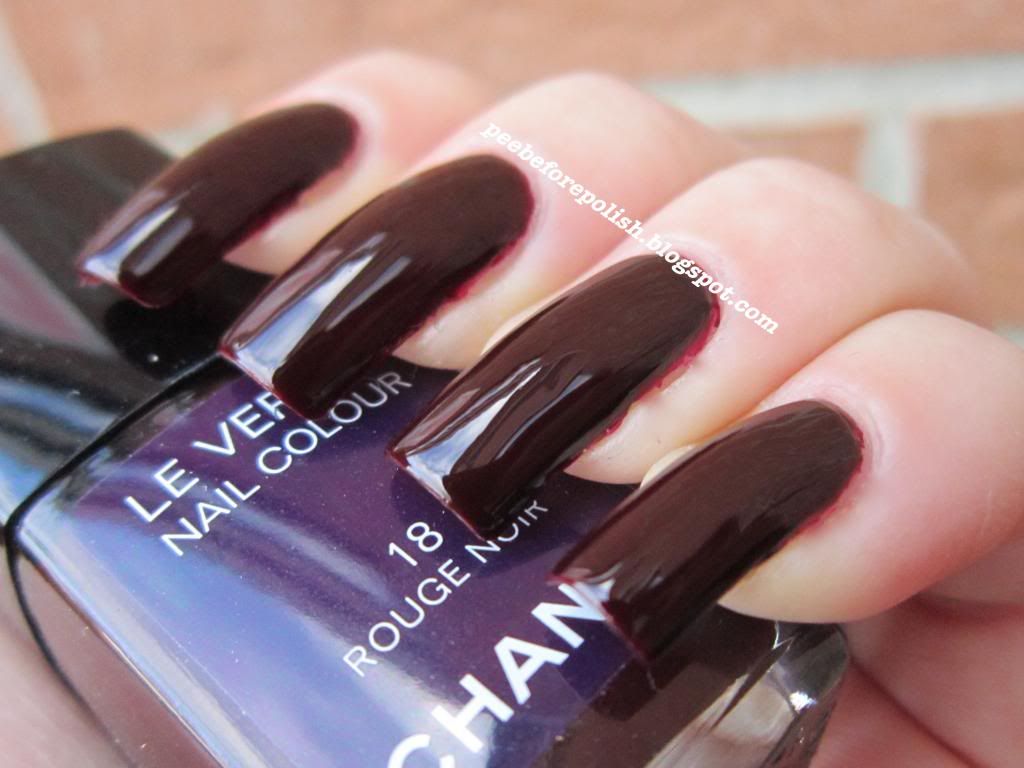
Per la R mi gioco un grande classico, lo Chanel Rouge Noir.
Quando ho smesso di mangiarmi a sangue le unghie, i primi smalti che ho comprato sono stati Chanel. All'epoca (parlo del 2008) nomi come China Glaze, OPI e Orly erano a me sconosciuti, Kiko non era ancora approdata nella mia città e i grandi marchi mi sembravano l'unica (o quasi) alternativa.
Ho sorriso tirando fuori dal cassetto il Rouge Noir, perché è evidente che è stato largamente usato, mentre ora fatico a provare tutto quello che è nella mia untrieds box.
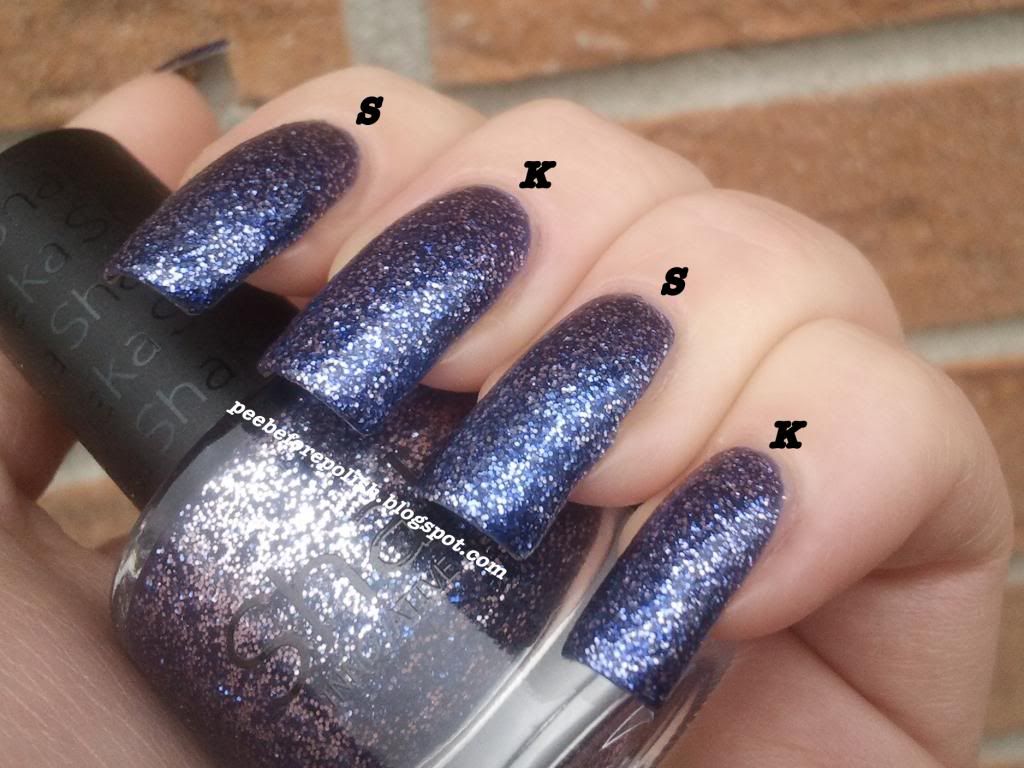
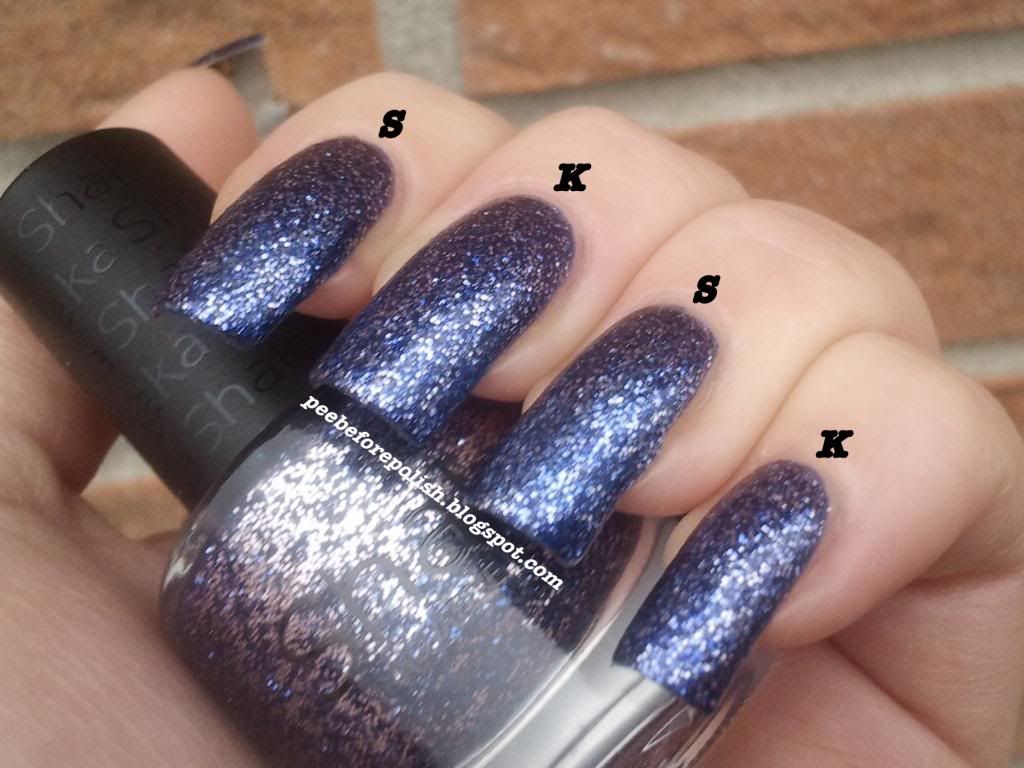
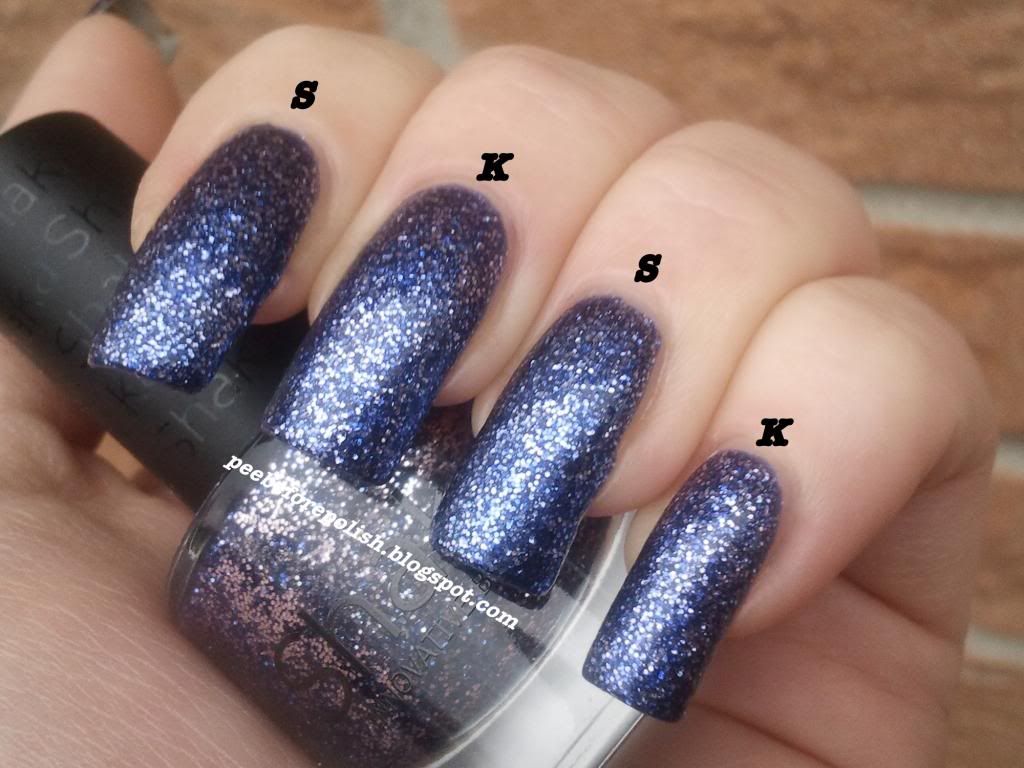
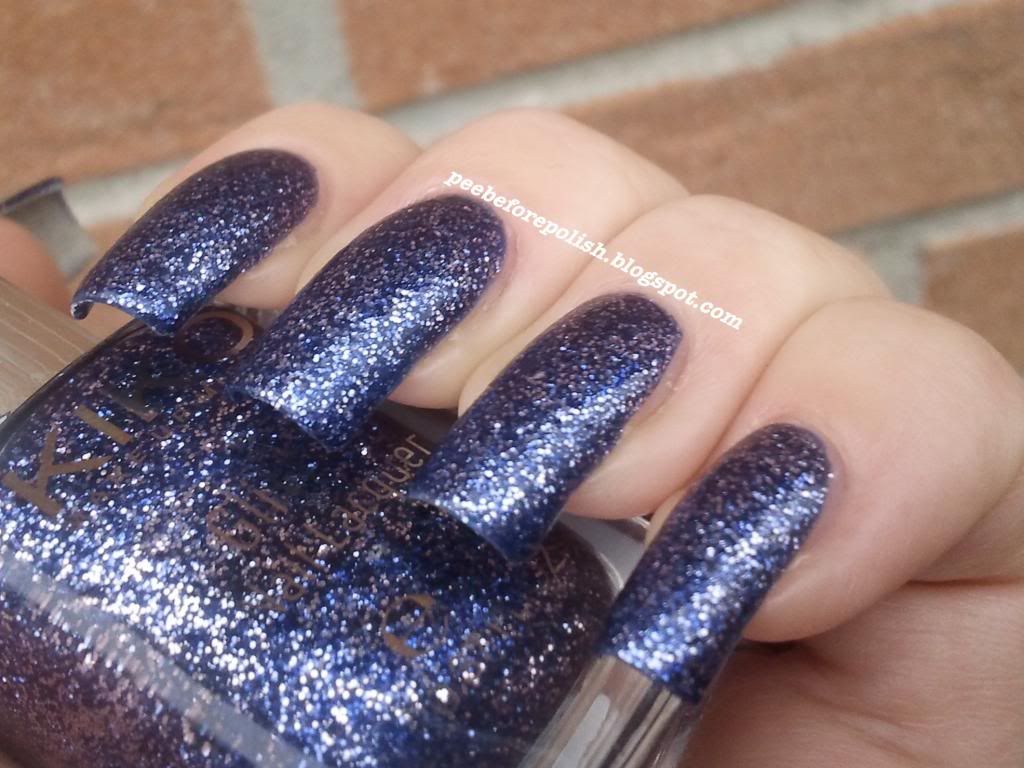
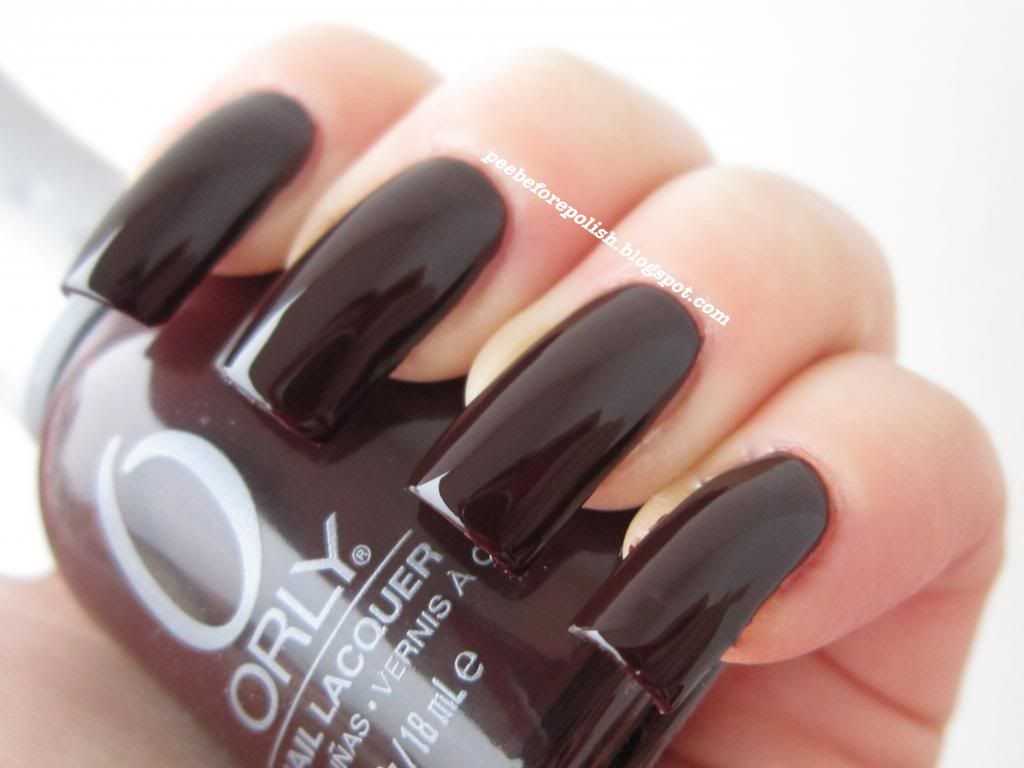
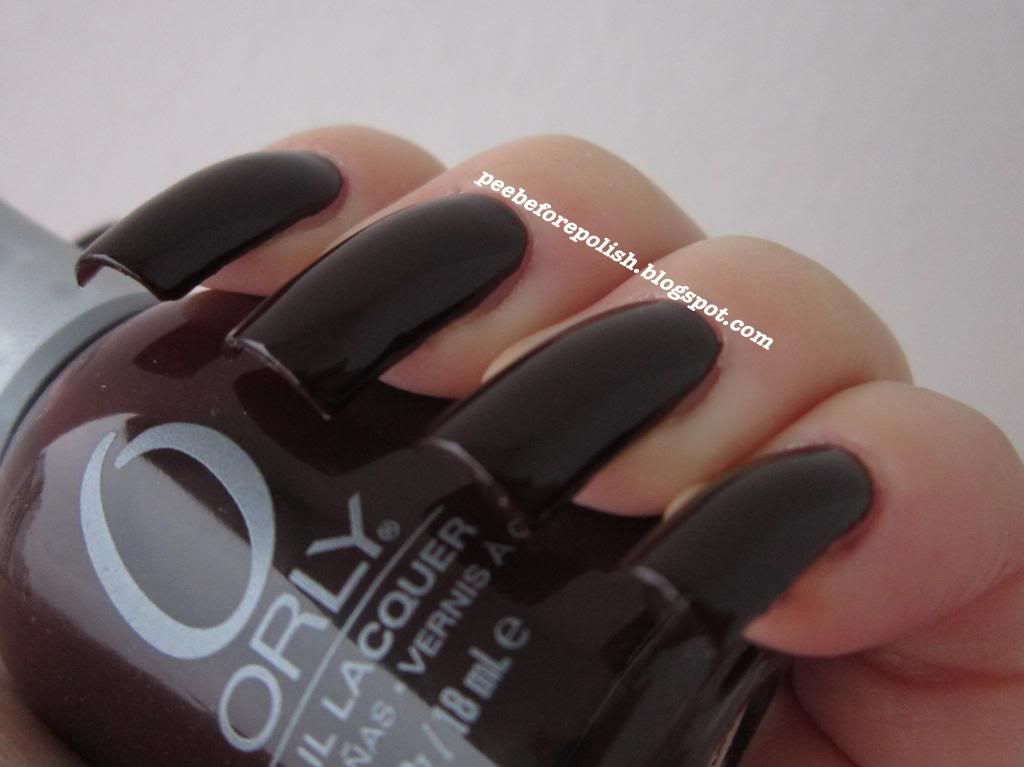
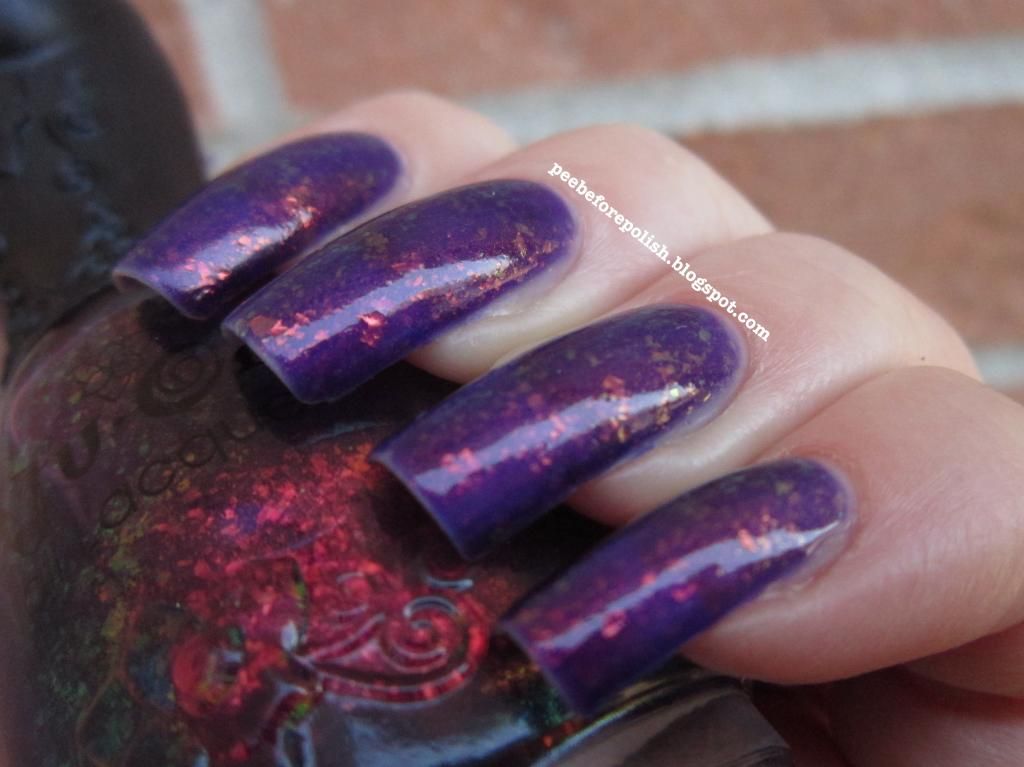
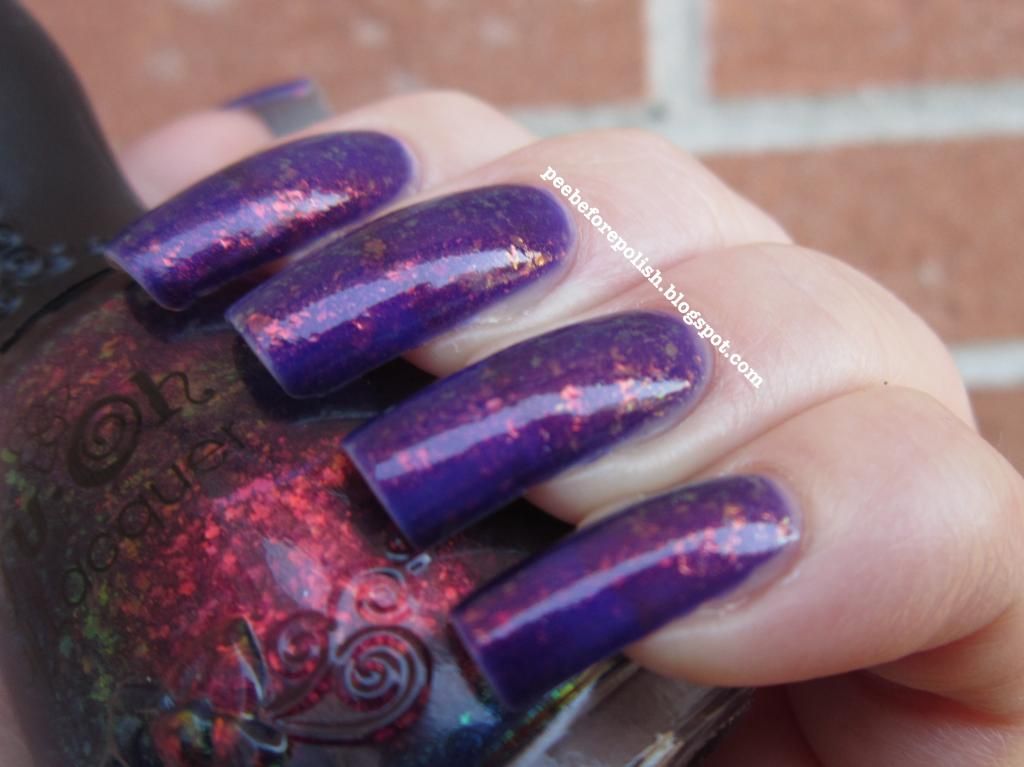
Comunque, il Rouge Noir è un classico nero-rosso con inflessioni marroni. Il finish è cremoso ed asciuga molto lucido anche senza bisogno di top coat.
La perfetta coprenza si ottiene in due mani, e l'applicazione è resa leggermente difficoltosa da una formula un tantino liquida. L'asciugatura è molto rapida.
I difetti che principalmente ha questo smalto, per lo meno ai miei occhi, sono due: in primis, stinge. Ovvero: dopo aver atteso dieci minuti vado a passare il top coat, ma il pennello dello stesso si va a tingere immediatamente di rosso non appena tocca il Rouge Noir. Ciò mi costringe a pulire il pennello ogni volta che devo ripucciarlo nella boccetta, se non voglio che il top coat diventi da trasparente a rosato.
In secondo luogo: la durata. A parte il Dragon, nessuno dei sei smalti Chanel in mio possesso ha mai superato incolume il giorno tre. Il Rouge Noir non fa eccezione in tal senso.
Tornando indietro, non lo ricomprerei di certo. Anche perché oggi come oggi siamo infestati da suoi dupe ben più economici. Come colore è sicuramente un must have, un passepartout, elegante e di classe, ma i suoi difetti fanno sì che io sia costretta a dire che non vale i 22€ che costa oggi, né i 18€ che io pagai nel 2008.
Di certo, ad anni dal suo lancio, è ancora uno degli smalti più venduti e ricercati, merito anche dell'aura mitica che circonda lui e il marchio che lo produce.
Per oggi è tutto, vi lascio alle foto e vi auguro una buona serata!
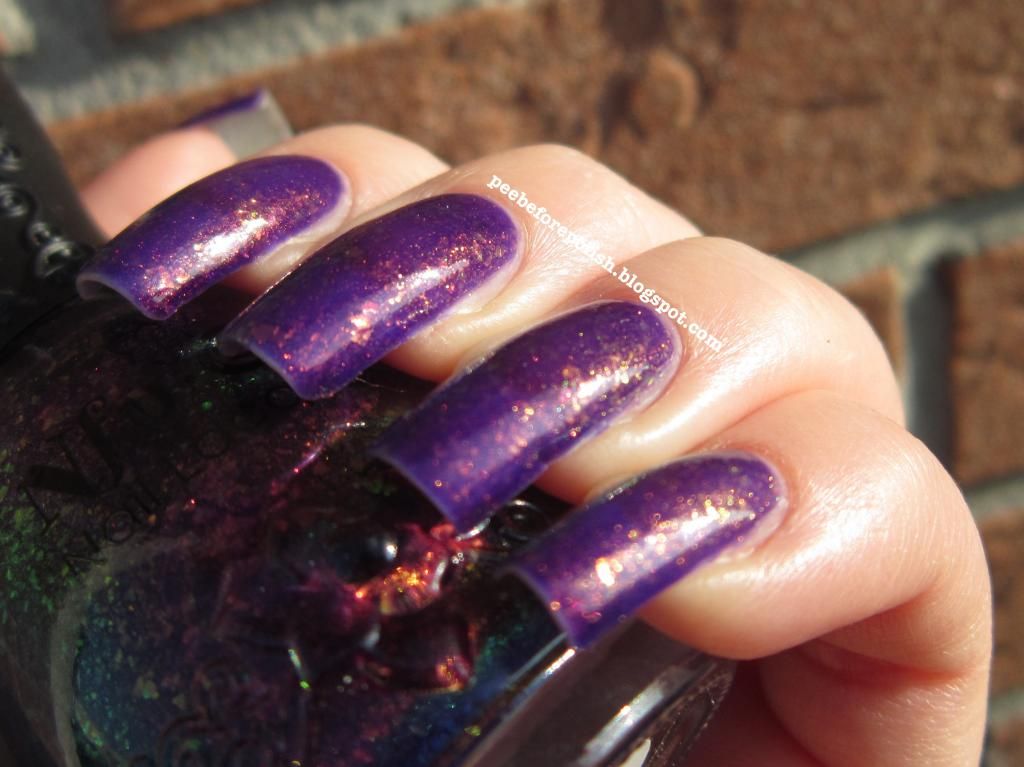
(ps: scusate per l'applicazione ad mentula canis, ma la combinazione formula liquida+febbre e tremolio mi ha fatto andare lo smalto un po' ovunque; in circostanze normali sarei andata di clean up, ma onestamente non me la son sentita, stavo troppo male e volevo solo andare a letto)


Hi ladies
and welcome back to ABC Challenge!
For letter R I picked an old classic nuance, Chanel Rouge Noir.
When I stopped biting my nails, the first polishes I bought were by Chanel. At that time (it was 2008) I ignored the existence of brands like China Glaze, OPI or Orly, and Kiko hadn't a store in my city yet, so I had only a few brands to consider for the purchase of a nail polish: high end brands like Chanel, Dior, YSL, or most popular brands like Pupa or Collistar.
Looking at the bottle of Rouge Noir, I smiled because it is evident that I've really used it a lot... Now I rarely use a polish as much as I used Rouge Noir, maybe because now I have more than 5 nail polishes including base and top coat!
Anyway: Rouge Noir is a classic blackened red with a hint of brown. It has a creme finish and it dries super glossy even without a top coat.
Two coats for the perfect coverage, but formula is a bit runny for my taste so application isn't the best ever. Drying time is really fast.
In my opinion, this polish has mainly two defects: first-of-all, it stains. Not on the nails, but on the brush of the top coat. I always wait ten minutes before applying a top coat on a polish (even more if I did some stamping), but when I touch the surface of my nails with the brush, this becomes immediately red. I am obliged to clean constantly the brush on a paper tissue if I don't want that my top coat turns into light pink.
Secondly: the longevity is poor. I have six Chanel polishes in my stash and only Dragon has an excellent longevity. The other five, including Rouge Noir, last less than three days before tip wears.
In conclusion: we all know that Rouge Noir is a beautiful color, a passepartout, it is so classy and elegant. There's a reason if it is still a best seller even if it was launched many years ago. It has a sort of "golden air". 
But I don't think I'd buy it again: I paid 18€ for it (it actually retails for 22€) and I don't think it's worth the price. Actually there are so many dupes of Rouge Noir; well, maybe they're not "the Original Nuance", maybe they're not by Chanel, but they are identical and much cheaper.
That's all I have for you today, talk to you soon and have a nice evening! 
(ps: I'm sorry for the bad application of this polish. As I wrote before, its formula is runny plus I was shaken by shivers. I rarely apply badly a nail polish, but when it happens I always do a clean up. I hadn't the strenght to do that in this case, I had flu and I only wanted to go to bed!) 


Applicazione / Application
3.5/5
Asciugatura / Drying time
5/5
Coprenza / Pigmentation
4.5/5
Durata / Longevity
2.5/5
GIUDIZIO FINALE / OVERALL
3.75/5

mercoledì 28 novembre 2012

Polish wars: Kiko #407 Starry Indigo VS Shaka Mistery

Buonasera a tutte!
Per stasera vi propongo una comparison tra il nuovo Kiko #407 Starry Indigo, appartenente alla LE Dashing Holidays ed appena swatchato qui, e il Mistery di Shaka, sempre proveniente da una LE, la Winter Party.
Vorrei ringraziare Emanuela per il suggerimento di fare questa comparazione tra i due smalti!
Lascio prima parlare le foto:


Hi ladies!
Today I have a comparison between Kiko #407 Starry Indigo, from the recent LE collection Dashing Holidays, and Shaka Mistery, from Winter Party LE.
I want to thank Emanuela who suggested me to do this comparison in the comment of my recent post about Starry Indigo.
First-of-all, I want to show you the pics:


Vedete le differenze? Ecco, io no.
Il mio parere è che il Kiko sia uno Shaka con meno thinner (o qualunque altra cosa usino per rendere più o meno densa la formula di uno smalto).
Il colore è identico in tutto e per tutto, mentre formula ed applicazione sono diverse: come già scritto, il Kiko ha uno formula decisamente molto densa. Lo Shaka ne ha una più fluida e più scorrevole.
Ne consegue che con una passata il Kiko sia più coprente, ma credo sia un parametro ininfluente visto che dovrete comunque procedere ad una seconda mano per coprire bene l'unghia.
Asciugatura identica, e pare che si possa dire la stessa cosa per la durata (mi riprometto però di aggiornare questo dato perché ce l'ho su da due giorni e mezzo ed è ancora perfetto).
Il rapporto quantità/prezzo è leggermente a favore di Shaka (0.39€/ml contro 0.44€/ml di Kiko).
Insomma, signore, credo di poter annunciare che habemus dupe!


Do you see any difference? I don't.
I can say that Kiko #407 and Shaka Mistery look exactly the same. 
The only difference is in their formula (and application as a consequence). Starry Indigo has a very dense formula. Mistery has a more fluid and easier to apply formula. 
With only one coat of product, Kiko Starry Indigo has a better coverage; anyway, you will need a second coat to obtain a perfect coverage, so I don't see a true difference even here.  
Drying time is fast in both cases, and longevity seems to be similar too (I'm not sure about this, I have to update the post, because I've been wearing Shaka Mistery for only two days and a half and it is still perfect).
Kiko Starry Indigo costs 0.44€ per ml (4.90€ for a bottle which contains 11ml), while Shaka Mistery 0.39€ per ml (1.99€ for a bottle which contains 5ml), so it is a bit cheaper.
Well, I think I can say: ladies, we have a dupe!

 
KIKO #407 STARRY INDIGO
Applicazione / Application
4/5
Asciugatura / Drying time
4.5/5
Coprenza / Pigmentation
4.5/5
Durata / Longevity
4.5/5
GIUDIZIO FINALE / OVERALL
4.25/5

SHAKA MISTERY
Applicazione / Application
5/5
Asciugatura / Drying time
4.5/5
Coprenza / Pigmentation
4/5
Durata / Longevity4.5/5
GIUDIZIO FINALE / OVERALL
4.5/5

lunedì 26 novembre 2012

ABC Challenge: Q for Kiko #407 Starry Indigo

Benvenute nella più ostica delle puntate della ABC Challenge!
Ostica per via della lettera: insomma, non è che con la Q ci sia molto da scegliere.
Per cui, dietro suggerimento delle compagne di merende Simona ed Elena, ho optato per il Kiko #Quattrocentosette Starry Indigo, uno dei nuovi glitter della collezione natalizia Dashing Holidays.
Starry Indigo ha una base blu-viola con tonnellate di glitter argento-violacei e blu. La formula è davvero densissima, il che rende un pelo più difficoltosa l'applicazione ma, al contempo, fa sì che un'enorme quantità di prodotto venga trasferito su unghia. In questo modo, con due passate la coprenza perfetta è ampiamente servita.
L'asciugatura è molto rapida e la durata è media.
Di certo non è uno smalto da colloquio di lavoro, ma lo trovo bellissimo e molto luminoso, insomma perfetto per le feste. O anche non solo: io non ne ho mai abbastanza dei glitter, voto per indossarli sempre e comunque!
Vi lascio alle foto, sono un po' triste all'idea di non riuscire a farne da eoni alla luce solare diretta, ma brutto tempo e nebbia sembrano non volerci abbandonare ancora per una settimana... Uff.
Non dimenticate di guardare le entries delle altre ragasssssuole e a presto!


Hi ladies and welcome back to another post from ABC Challenge!
It was hard to choose a polish for letter Q. I have only a polish from an italian cheap brand called Quando è but I didn't want to wear it because I've already showed it in my first water marble.
Then Simona and Elena suggested me to use a Kiko polish with a reference number which starts with #4. In fact, the italian word for "four" is "quattro". So, here it is Kiko #407 (Quattrocentosette) Starry Indigo from Dashing Holidays Collection.
Starry Indigo has a blue-violet base with lots of silver-violet and blue glitters. Formula is really thick and gloppy, but it wasn't hard to apply it. Thanks to this dense formula, a lot of product is transferred to the nails with only one coat and you'll need only two coats for the perfect coverage.
Drying time is fast and longevity quite good.
Maybe this is not a work appropriate shade, but I think Starry Indigo is a beautiful polish, a great choice for the Xmas period. 
That's all I have for you today, I'm a bit sorry because I can't take my pics in direct sunlight and, according to weather forecasts, I won't be able to take them for many days. Sgrunt.
Don't forget to check other girls' entries and have a nice evening!


Applicazione / Application
4/5
Asciugatura / Drying time
4.5/5
Coprenza / Pigmentation
4.5/5
Durata / Longevity
4.5/5
GIUDIZIO FINALE / OVERALL
4.25/5

domenica 25 novembre 2012

Orly Fired Up Collection: swatches and review (II part)

Buona domenica a tutte!
Tra una puntata ed un'altra della ABC Challenge, vi propongo la seconda parte della collezione Fired Up di Orly. L'introduzione la trovate qui, se invece volete vedere il primo terzetto, composto da Flare, Glow e Smolder cliccate qui.
Visto che si tratta di un post estremamente sostanzioso, non voglio ulteriormente perdermi in chiacchiere. Pronte? Via! 


Hi ladies!
Hope you're having a great week-end! Today I'm going to show you the second part of Orly Fired Up Collection. If you missed the previous posts, I introduced it in this post, and here I showed you the first three polishes of the collection, Smolder, Flare and Glow.
This post will be full of information and pics, so... Let's go!


L'Orly Flicker è un rosso fortemente aranciato con shimmer tono su tono ed inflessioni ramate piuttosto evidenti. Due mani per la perfetta pigmentazione, asciugatura molto rapida e durata eccellente.
Nulla da eccepire su formula ed applicazione: scorrevole e semplicissima.


Orly Flicker is an orange red with orange, gold, bronze and copper shimmer. Two coats in my pics.
Formula is great, application is super easy and drying time is really fast. 
It has a great longevity too.


L'Orly Ignite è un grandissimo classico con una particolarità: il finish. Infatti si tratta di un classico rosso Biancaneve dal finish jelly. Io amo fortissimamente, follemente, irrazionalmente i rosso jelly!
Ignite ha bisogno di tre passate per ottenere la coprenza perfetta e ha una formula un po' liquida, per cui consiglio passate sottili onde evitare che lo smalto "scappi" verso le cuticole.
L'asciugatura è rapida e, anche in questo caso, la durata è molto elevata.

Orly Ignite is a classic color with a pleasant peculiarity: its finish. In fact, Ignite is a classic "Snow White" red with a jelly finish. I really, really, really love jelly reds!
Ignite needs three coats for the perfect coverage and has a runny formula, so pay attention to apply thin coats if you don't want to dirty your cuticles. 
Drying time is fast and longevity is excellent.


Infine, Rapture, un marrone scuro ed intenso dal finish creme. Pigmentazione eccellente, è quasi un one coater. Asciuga molto in fretta ed in modo insanemente glossy.
Formula grandiosa e durata molto buona.

Last but not least: Rapture, a deep brown with a creme finish. Pigmentation is excellent, it could be a one coater. It dries fast and it is super glossy.
Also, formula is great and longevity is good.


Orly Fired Up: Collection Recall


In conclusione, ho molto apprezzato la Fired Up per l'alternarsi di diversi finish (shimmer, jelly e creme) e per il fatto che abbia proposto dei grandi classici ma con un tocco glamour in più.
In questo modo credo che incontri un po' tutti i gusti, sia di chi sulle unghie ama osare, sia chi preferisce "andare sul sicuro".
Oltre che darvi appuntamente a domani con un'altra puntata della ABC Challenge, nuntio vobis gaudio magno che sono quasi pronta con gli swatches della collezione natalizia sempre di Orly, la Naughty and Nice, ma anche con tante altre novità invernali di vari brand (tra cui la "nostra" Kiko).
Saranno settimane intense e piene di tentazioni smaltose, siete avvisate!
Buona giornata a tutte!


In conclusion, I have appreciated this collection thanks to the presence of different finishes (shimmer, creme and jelly) and because I think it includes classical colors with a touch of glamour.
For this reason I think these shades are great for ladies who want "something different" of for those ladies who prefer to use classical colors. 
Tomorrow there will be another post dedicated to ABC Challenge, but I also want to say that swatches of the Xmas collection by Orly, Naughty and Nice, are ready to be posted, I can't wait to show them to you! Moreover, I have lots of products to show you, i.e. a couple of polishes from the last Kiko collection or MAC gift boxes for Christmas...
A lot of temptations incoming! 
Hope you're having a great week end and... See you soon!


FLICKER
Applicazione / Application
5/5
Asciugatura / Drying time
5/5
Coprenza / Pigmentation
4/5
Durata / Longevity
5/5
GIUDIZIO FINALE / OVERALL
4.75/5

IGNITE
Applicazione / Application
3.5/5
Asciugatura / Drying time
5/5
Coprenza / Pigmentation
3.5/5
Durata / Longevity
5/5
GIUDIZIO FINALE / OVERALL
4/5

RAPTURE
Applicazione / Application
5/5
Asciugatura / Drying time
5/5
Coprenza / Pigmentation
4.75/5
Durata / Longevity
4.5/5
GIUDIZIO FINALE / OVERALL
4.75/5

Sito web di Ladybird House
Pagina Facebook


*** I prodotti del post mi sono stati inviati a scopo valutativo ***
*** Products in this post were sent me for review ***

giovedì 22 novembre 2012

ABC Challenge: P for Polka Dots

Buongiorno a tutte e ben ritrovate con la ABC Challenge!
Oggi vi mostro la mia prima nail art a pallini (Polka Dots però fa più phaigo).
Prima, una digressione - ma va? Dovrei seriamente pensare ad un giveaway per chi si legge da cima a fondo i miei pipponi esistenzialistici della post adolescenza.
Io non capisco perché le cose complicate mi riescano con facilità e naturalezza (classici esempio la one stroke o la water marble) mentre una cosa super easy come la polka dots mi abbia fatta sbarellare. Non riuscivo a prelevare la giusta quantità di colore, un pallino mi veniva enorme, l'altro minuscolo, un altro ancora sembrava una quadrato sbilenco e non un pallino. Ma vabbé.
Questo è il risultato finale e, sbiellamenti a parte, mi piace moltissimo!
Lo smalto di base è l'Essie Knockout Pout.
Sull'indice ho applicato, solo in un angolo dell'unghia, l'Orly Purple Leather, un viola carico dal finish vinile.
Sul medio, sempre su un angolo, il China Glaze Light as Air, un lilla chiaro creme.
Sul mignolo, l'Eyeko Nude Polish (vade retro Satana, mai più questo smalto, MAI PIU'), un nude creme dalla formula liquidissima che più liquida non si può.
Sul pollice li ho usati tutti e tre, creando una specie di gradient pallinosa (!) e riempiendo l'intera unghia.
Infine, anche per l'anulare ho scelto un full nail design, optando però per tre colori holo: Layla Misty Blush in alto, al centro China Glaze IDK e alla base dell'unghia Nfu Oh #63.
Non vi sarà difficile immaginare a che carnaio di bocce ci fosse sul mio tavolo quando l'ho realizzata!
Spero che il risultato finale vi piaccia ed a presto con la Q, e non dimenticate di curiosare in mezzo alle entries delle altre dame!


Hi ladies and welcome back to ABC Challenge!
Today I'm going to show you my first Polka Dots manicure.
But first-of-all, a couple of considerations. I don't know why, but those nail arts which are usually considered a bit hard to realize (such as one stroke or water marble) are extremely easy to me.
On the contrary, I have serious issues when I do super simply nail arts or designs, such as polka dots. 
This mani was a real challenge!!!! My dots were different in sizes, even if I used the same dotter to do them. Some of them were not round but square, etc. etc.
In the end, I like a lot the final result, but what a struggle!
Well, this is a list of the products I used. The base color is Essie Knockout Pout.
On the index finger I applied, only in a little part of the nail, Orly Purple Leather, an intense purple with a vynil finish. 
For the middle finger I chose China Glaze Light as Air, a light lilac with a creme finish.
On the pimkie I used Eyeko Nude Polish (I swear, I will never, never, NEVER use this polish again in my entire life), a sheer nude with a creme finish and a super runny formula.
On my thumb I realized a full nail design, using all the polishes written above in a sort of "gradient polka dots".
I chose a full nail design also for my ring finger, but I added a touch of magic with three holographic polishes: Layla Misty Blush on the top, China Glaze IDK in the middle and Nfu Oh #63 at the base of the nail. 
As you can imagine, there was plenty of nail polish bottles on my table during the realization of this nail art!
Hope you like this mani, see you soon with letter Q and don't forget to check the other ladies' entries!


mercoledì 21 novembre 2012

Mont Bleu Glass Nail File: swatches and review

Buonasera a tutte!
Qualche settimana fa avevo scritto un post introduttivo sui prodotti Mont Bleu nonché recensito le pinzette che mi avevano gentilmente mandato.
Avevo anche preannunciato una recensione sulla loro lima in vetro e, dopo diverse settimane di testing, sono pronta per partorirla!

Innanzitutto, le lime della Mont Bleu si suddividono principalmente in quattro linee: classic line, elegant line, crystal line e jewellry line. Le prime sono le più semplici: non hanno applicazioni ma possono essere trasparenti, colorate con effetto degradé o con l'impugnatura stampata.
Le lime della elegant e della crystal, cui appartiene quella che ho ricevuto io, hanno invece applicazioni Swarovski. Infine, le jewellry hanno applicazioni in materiali semi preziosi come l'argento, il bronzo e pietre dure.

La mia unica esperienza pregressa con una lima in vetro è stata con quella della Kiko. Non mi sono trovata bene giacché limare le unghie diventava un vero e proprio lavoro: impiegavo circa 50 minuti per farlo. Io limavo, premevo, ma l'unghia non si consumava e mi si infiammava il tunnel carpale.
Non è un caso che io l'abbia persa: considerando la meticolosità al limite della compulsione con cui tengo ogni attrezzo che riguarda le unghie, non posso che attribuire questa sparizione al mio subconscio che tentava di proteggermi.
Deo gratias, con la lima della Mont Bleu non ho avuto affatto questo problema, anzi.
A mio avviso, il vantaggio più grosso che scaturisce dall'uso di questa lima (oltre ai soliti che derivano dall'uso delle lime di vetro tutte, come il fatto che non danneggiano l'unghia come quelle di metallo delle nonne e sono più delicate persino di quelle di cartone) è la versatilità della stessa: a seconda della pressione applicata si ottiene un effetto chiaramente direttamente proporzionale alla forza impressa.
Per capirci: con una pressione più decisa si accorceranno notevolmente gli artigli; al contempo, regolando la forza, si potrà ottenere una limatura più blanda od ancora aggiustare gli angoli delle unghie.
L'unica mia preoccupazione riguardava il "fastidio" che avrebbe potuto derivare dalla presenza di applicazioni proprio sull'impugnatura, ma per fortuna non ho avvertito nessuna noia persino durante quella che passerà alla storia come la "limatura campale" di un paio di settimane fa.

In conclusione: una lima di buona, o meglio ottima fattura, è uno strumento fondamentale, nella mia modesta opinione. Di certo posso annoverare le Mont Bleu in questa categoria. Mi piace che il loro range di prodotti sia molto vario: si passa dalle lime da viaggio a quelle "regular" (come la mia, che misura 135 mm x 2 mm di spessore) fino ad arrivare a quelle specifiche per i piedi, e che si possa scegliere tra quelle più basic a quelle più sfiziose ed addirittura gioiello, senza però spendere grosse cifre. Ancora, si possono scegliere dei sets con più pezzi o designs particolarissimi come quelli della linea 3D, o quella dedicata ai segni zodiacali, o quelle con disegni fatti a mano, ecc.
A me la mia è piaciuta così tanto che credo ne prenderò alcune, sempre della linea exclusive dato che sono le mie preferite, come regalino di Natale per qualche amicicia che ha fatto la brava bambina durante l'anno (!).
Inoltre tra pochissimo ci sarà la promozione legata al black Friday, con una settimana di sconti esagerati (40%).
Per oggi è tutto (e ve pare poco, ho scritto 'na cifra!), a domani con la ABC Challenge e nel frattempo... Buona serata!


Hi ladies!
A few weeks ago I wrote an introductory post on Mont Bleu products and a review of their tweezers. I also announced a review of their glass file and, after several weeks of testing, I'm ready for writing it! 
Firstly, Mont Bleu's files could be mainly divided into four lines: classic line, elegant line, crystal line and jewellry line. The first are the most simple: they don't have applications but can be transparent, colored with a gradient effect or printed. 
Files that belong to elegant and crystal lines have instead Swarovski applications. 
Finally, jewellry files have applications in semi-precious materials such as silver, bronze and precious stones. 

My only prior experience with a glass file was with that by Kiko. I wasn't happy with it since filing my nails became a real work: it took me about 50 minutes to do that. 
I filed, I pressed, my carpal tunnel hurted and it seemed a never ending work. 
It is not a coincidence that I lost it: I can attribute its disappearance to my subconscious which was trying to protect me. 
Deo gratias, my Mont Bleu file has a much, much better quality. In my opinion, the biggest value of this product is its versatility: depending on the pressure applied, you will obtain an effect which is proportional to the impressed force. With a stronger pressure you will greatly shorten your "claws"; at the same time, adjusting the force, you can obtain a slighter filing or even adjust the angles of your nails.
Moreover, as you probably know, glass files in general are much more delicate than metal files and they don't damage the nails. They are even more delicate than cartboard files.

My only concern when I first saw this files was the presence of the Swarovski application on its handle; I was afraid that they could bother me during its use. Luckily, these Swarovski crystals don't hurt but are only nice to see!
In conclusion: as we all know, a good file, or better, an excellent file, is an essential tool for a woman. I can list my Mont Bleu file in this category. I also like the fact that they have a wide range of products: there are mini files or "regular" ones, (like mine, which measures 135 mm x 2 mm), specific files for feet, and you can choose basic products or more extravagant ones. Moreover, they have excellent prices. 
I like this file a lot, and I think I'm going to order a few of them as Christmas gifts for a couple of friends.
Moreover in a couple of days there will be a huge discount thanks to the black Friday sale (40% off on all orders).
Well, that's all I have for you today, see you tomorrow with another post of the ABC Challenge and, in the meanwhile... Have a wonderful evening!  

 
Mont Bleu on line shop
Web page for wholesaler
Facebook Page, Twitter and Blog

***Product in this post was sent me for review***
***Il prodotto in questo post mi è stato inviato dall'azienda***

lunedì 19 novembre 2012

ABC Challenge: O for One Stroke

Arrivata ormai alla O della nostra Nail Challenge, mi sono resa conto di non aver fatto nessuna nail art ad eccezione della french manicure. Come preannunciato, recupero con la O e recupererò con la P.
O sta per One Stroke, tecnica di micropittura su unghie.
In genere, per le mie poche nail art, prendo ispirazione da foto e tutorial altrui e cerco di rivisitarle e cambiarle a mio gusto.
Per la one stroke ho deciso, invece, di seguire pedissequamente questo tutorial di Tartofraises, visto che era il mio primo tentativo in assoluto e non volevo complicarmi ulteriormente la vita.
Descrivo brevemente il procedimento per le non francofone, anche se il video è piuttosto significativo anche senza capirne l'audio. In alternativa, Tartofraises ha anche un canale in inglese.
Dopo aver steso la base (MAC Spirit of the Truth) ho eseguito una veloce gradient... Inversa (dalla base dell'unghia fino a, grosso modo, l'inizio della parte bianca); questo è peraltro l'unico passaggio non presente nel tutorial. Lo smalto usato per la gradient è il Kiko 298.
Ho poi preso un colore acrilico bianco e un pennello (il mio è tagliato in obliquo, ma va bene anche piatto, purché sia piccino picciò); dopo aver intinto circa 1/3 del pennello nel colore, l'ho scaricato tracciando qualche linea su una superficie plasticosa come un piatto usa e getta. A quel punto ho disegnato i petali. In genere bisogna ripassare una seconda volta per rendere più visibile il disegno.
I ghirigori e le foglioline le ho invece disegnate con un pennellino di precisione, e ho concluso aggiungendo i pallini con un dotter e applicando un piccolo strass azzurro.
Spero che vi piaccia, credo che come primo tentativo non sia niente male e ne sono davvero soddisfatta nel complesso.
A presto con la P, e se vi va lanciatevi nel toto scommesse sulla nail art scelta (smaltare facebookiane anonime: voi sapete, non parlate e non scrivete!!!!!).


Wow. I'm writing the post number fifteen for the Alphabet Challenge and I've published only a nail art (the french manicure). I have to do more so let's start from letter O!
O for One Stroke, a well known technique which is, IMO, simply beautiful. It's difficult to realize, you need a bit of time, but the designs you can obtain are stunning. 
When I realize a nail art, I often take inspiration from other ladies' works or tutorials, but I always try to revisit their ideas and I always change something.
But since this was my first attempt with one stroke, I decided to follow word for word the instructions of this tutorial by Tartofraises
In the Italian version of this post I included a short description of what I did for those girls who don't speak French. I don't think this is necessary in English because I know that Tartofraises has an English channel. Anyway, for my manicure I used MAC Spirit of the Truth as a base, Kiko 298 for the gradient, a white acrylic paint, a detail brush, a one stroke brush, a dotting tool and some light blue rhinestones.
Hope you like this design, I'm very happy with the result considering this is the very first time I realize a one stroke nail art.
See you soon with letter P... Which will be another nail art. Guess which...? 


sabato 17 novembre 2012

Polish wars: Color Club Magic Elf VS Basic Beauty #103 VS Ever #52

Buongiorno a tutte!
Post programmato, sono momentaneamente fuori città (Bologna, per la precisione) per cui ci metterò un po' a rispondere ai commenti.
Questa settimana è stata insanamente intensa. Sono veramente a pezzi e persino con poca voglia di girovagare e shoppingare in una città con negozi assai più interessanti di quelli che vedo di solito.
Vorrei solo rannicchiarmi in posizione fetale e dormireeeeee!
Per oggi ho preparato una comparison a tre tra il Color Club Magic Elf, il Basic Beauty #103 e l'Ever #52.


Hi ladies!
This is a scheduled post, I'm out of city today, so I will publish and reply to comments tomorrow.
I've had a tiring and super busy week. I'm exhausted. I'd sleep for an entire day... 
Anyway, back to us: today I have a polish war for you. The protagonists are three nail polishes, and two of them are by Italian brands: Color Club Magic Elf, Basic Beauty #103 and Ever #52.


Come avrete notato voi stesse, questi smalti sono assai simili tra di loro. Il più diverso è il Color Club, che ha nel verde della base un tocco di acido; inoltre, non lo definirei un foil, ma un shimmer con tonnellate e tonnellate di particelle tono su tono e dorate.


As you can see, these polishes are really, really similar. Color Club is the most different: the green of the base has a touch of acid and I won't define it as a foil; it is more a super, super, super shimmered polish.


Il Basic Beauty e l'Ever sono praticamente dupe. Ok, ad un'osservazione più che attenta, anzi direi maniacale, l'Ever ha qualche particella dorata in più, ma è quasi impossibile notare la differenza.

Basic Beauty #103 and Ever #52 are definitely dupe. Ok, if you look very carefully Ever has a bit more of gold particles in it, but it's almost impossible to see the difference.


In conclusione, direi che se possedete uno di questi smalti potete anche saltare gli altri due.
Il fatto che a livello qualitativo siano, nuovamente, sostanzialmente identici tra di loro, non aiuta a consigliarne uno su tutti!
Inoltre, aggiungerei che il Basic Beauty è un dupe perfetto anche dello Zoya Apple, che è una gran notizia considerato quanto è difficile reperire gli Zoya da noi (e quanto costano, poi!).
Per oggi è tutto, spero che passiate uno splendido fine settimana e a lunedì con un'altra puntata della ABC Challenge!


In conclusion, I think that if you have one of these polishes you can skip the other two.
These polishes are extremely similar also in terms of pigmentation and longevity, so I really don't know which one to suggest.
Moreover, Basic Beauty #103 is a dupe also for Zoya Apple, which is a good news expecially for Italian ladies!
That's all I have for you today, I hope you will have a super nice week end and see you on Monday with another post of ABC Challenge!


BASIC BEAUTY #103
Applicazione / Application
5/5
Asciugatura / Drying time
5/5
Coprenza / Pigmentation
4/5
Durata / Longevity
4/5
GIUDIZIO FINALE / OVERALL
4/5

COLOR CLUB MAGIC ELF
Applicazione / Application
5/5
Asciugatura / Drying time
4.5/5
Coprenza / Pigmentation
4/5
Durata / Longevity
4.5/5
GIUDIZIO FINALE / OVERALL
4.5/5

EVER #52
Applicazione / Application
5/5
Asciugatura / Drying time
4.5/5
Coprenza / Pigmentation
4/5
Durata / Longevity
4/5
GIUDIZIO FINALE / OVERALL
4/5

giovedì 15 novembre 2012

ABC Challenge: N for Nfu Oh #51

A voi è mai capitato di parlare con uno dei vostri smalti?
Che siete lì e, mentre lo stendete o rimirate, continuate a dirgli: "Oooooh, ma come sei bello, ma come ho fatto bene a comprarti, ma che meraviglia che sei?".
No, non siete capitate nel perverso gioco "Indovina quale disturbo di personalità ha la Cristina", siete sempre sintonizzate su una nuova puntata della ABC Challenge.
Comunque, l'Nfu Oh #51 è uno di quegli smalti che mi provoca il comportamento di cui sopra.
Potete veramente biasimarmi di fronte a cotanto spettacolo?
L'Nfu Oh #51 ha una base jelly blurple (ovvero una via di mezzo tra il blu e il viola) un po' sheer e una miriade di flakies multichrome, che cambiano dal rosso, all'arancio, al dorato ed ancora al verde.
Questo patatone è talmente camaleontico che è un casino renderlo in foto, tant'è che ho fatto un paio di foto non proprio a fuoco per cercare di catturare ulteriori sfumature di colore dei flakies.
Può essere usato sia da solo (come nelle mie foto) che layerizzato sopra una base scura. Nel primo caso sono necessarie tre passate per ottenere la perfetta coprenza.
Nonostante i numerosi strati, l'asciugatura è piuttosto rapida e la durata davvero ottima.
L'applicazione è spettacolare, lo smalto si stende praticamente da solo.
L'unico neo è che "shrinka" (ovvero, si ritira) leggermente in punta subito dopo il top coat, ma questa è una caratteristica comune agli Nfu Oh con base jelly.
Analogamente a quanto già detto per altri Nfu Oh, fosse per me renderei obbligatorio per legge l'acquisto di cotanta sbrillosità ed ecletticità!
Vi lascio alla valanga di foto e vi ricordo che, se volete, ci sono tante entries da ammirare (ormai siamo davvero in tante a fissare questo appuntamento!).
Spoilerone: per la O e la P ho riservato due nail arts, dato che il mio percorso ne era un po' carente. A presto, dunque!


Have you ever talked with one of your nail polish?
Have you ever said, during its application: "Ooooooh you're beautiful, you're amazing, I'm so happy to have you in my stash and in my life!"?!?
This is not a sort of twisted game, "Guess which personality disorder Cristina has". This is another post for ABC Challenge.
But I swear that I really talk with the polish of the day, Nfu Oh #51.
Can you really blame me? Look at this beauty.
Nfu Oh #51 has a jelly blurple base and lots of multichrome flakies (they change from green to gold and from red to orange). This baby is so eclectic that it was really difficult to capture all the shades of its flakies. A couple of my pics are out-of-focus because I wanted to capture more colors.
This polish can be layered over a dark base or worn on its own. In my pics you can see three coats of Nfu Oh #51 all alone. 
Applying this polish is super easy, formula and brush are just perfect. It dries quite fast and has an excellent longevity too.
IMO this polish has only a defect: after applying a top coat, it shrinks a bit, as you can see in my pics. I noticed that all Nfu Oh polishes with a jelly base have this characteristic.
I have already said this thing for other polishes by Nfu Oh but I want to repeat it: IMO, you must have this product in your stash!
That's all I have for you today, if you want you can check the other ladies' entries and have a wonderful day!
ps. SPOILER: I have two nail arts for letter O and letter P... Guess what?


Applicazione / Application
5/5
Asciugatura / Drying time
4/5
Coprenza / Pigmentation
3/5
Durata / Longevity
5/5
GIUDIZIO FINALE / OVERALL
4.25/5